Search My Blog!!

Wednesday, April 27, 2011

Cake Batter Rice Krispie Treats

A few months ago, cake batter infused goodies began to appear all over the blogosphere world. I was intrigued. So when one of my good friends recently celebrated her 30th birthday, I knew I had to make these. She loves rice krispie treats. Loves them. When I think of birthdays, I automatically think of colorful celebrations. What a colorful, fun way to celebrate a birthday! They smelled awesome and tasted great. Plus, thanks to all of the cake batter recipes I saved, I have tons of things I can make with the leftover cake batter: pancakes, chocolate bark, cupcakes. Enjoy!
Cake Batter Rice Krispie Treats
from How Sweet It Is
Yield: 1 pan of Treats
Ingredients
  • 3 Tbsp unsalted butter
  • 10 oz bag marshmallows
  • 1/4c - 1/3 c yellow cake mix
  • 6 cups rice krispies cereal
  • 1.75 oz bottle of colored jimmies, divided
Instructions
  1. Melt 3 Tbsp butter over low heat in a large pot.
  2. Add marshmallows and stir until melted and mixed with butter.
  3. Add 1/4c - 1/3c of cake mix by spoonful until mixed thoroughly throughout.
  4. Remove marshmallow/cake mix mixture from heat and stir in 6 cups of rice krispies until krispies are covered with marshmallow mixture.
  5. Stir in half of the jimmies.
  6. Press into lightly-sprayed baking pan (any size will do). Top krispies with the remaining jimmies and press into krispies with back of a spatula. Let rest for 30 minutes before cutting.
  7. Enjoy!

Tuesday, April 26, 2011

Irish Beef Stew

I don't know how bloggers do it. They keep up with their postings daily. They even manage to post holiday specific recipes before the holidays so their readers can make that dish for the day. Well, I guess I missed the ball in posting this recipe for St. Patty's Day. Or even close to St. Patty's Day. And I did just find several Thanksgiving recipes that I never posted, so I'm glad I don't blog for a living. But, even despite the time delay, this stew recipe was too good not to share.
Yum! We actually did eat this irish stew for St. Patty's Day this year. I served it along with some beer bread that I mixed up. A bit of prep work was involved, but it worked out great. It is a crockpot recipe so after you get the meat and vegetables prepped, the meal cooks itself and comes out delicious. And the leftovers were absolutely divine! Next time you have a craving for some comfort food, I highly recommend this stew.
Irish Beef Stew
from Greens and Chocolate
Ingredients
  • 1/4 cup olive oil
  • 2 lb beef stew meat cut into 1-inch pieces
  • 6 cloves garlic, minced
  • 5-6 cups beef broth
  • 1 cup Guinness beer
  • 1 cup red wine
  • 2 Tbsp tomato paste
  • 1 Tbsp white sugar
  • 1 Tbsp dried thyme
  • 1 tsp Worcestershire sauce
  • 3 fresh bay leaves, or 2 dried
  • 2 Tbsp salted butter
  • 4 Yukon gold potatoes, peeled and cut into 1/2-inch pieces
  • 1 large white onion, chopped
  • 2 cups 1/2 inch peeled carrots
  • salt and pepper, to taste
  • 1/4 cup chopped fresh parsley, to top
Instructions
  1. Heat 2 Tbsp olive oil in a large skillet over medium-high heat. Working in batches, brown the beef pieces. Don't overcrowd the skillet and do not stir while browning; use tongs to flip pieces over. Continue to cook until all of the pieces are lightly browned on each side; set aside.
  2. In skillet, add 2 more Tbsp of olive oil and add the garlic; saute 1 minute. Add onion and cook until translucent.
  3. Add browned beef pieces, garlic, onions, carrots, potatoes, beef broth, Guinness, wine, and spices, to crockpot. Set crockpot on low for 8-9 hours, or high for 5-6 hours. Serve in bowls with some crusty bread and add extra Tomato paste if desired.

Friday, April 22, 2011

Hot Cross Buns

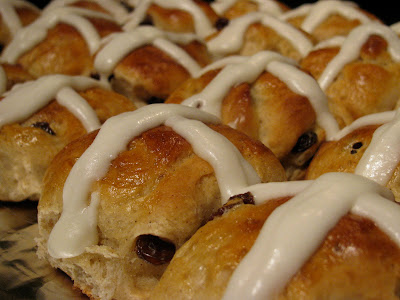
Yay! I'm starting to feel back to my normal self again. Meaning, I'm interested in being back in the kitchen. For the past few weeks, I was feeling quite under the weather and it was taking all of my energy to muster up even the blandest food. I made soup the other day and it tasted like a bowl of water with vegetables! Blech! Thankfully, I was feeling inspired for the coming Easter holiday and decided to attempt my hand at some Hot Cross Buns! It's Good Friday and these spiced buns are normally served today.
Hot Cross buns! Hot Cross buns! One ha' penny, two ha' penny, Hot Cross buns! If you have no daughters, give them to your sons. One ha' penny, two ha' penny, Hot Cross buns!

Does anyone remember this rhyme? I used to sing it all the time because it was in one the piano books I used to play from. But now I'm confused by it. Why do the daughters get the buns first? And what if the person had a daughter and a son? Does the son get one after the daughter? Or is the son s.o.l.? Hmm. I might need to do some research about this.

Anyway, these are absolutely delightful! For a treat that uses yeast, they are pretty low maintenance and easy. The dough was not sticky to deal with and I loved the way the butter was melted with the milk! These would be perfect for Easter morning or for a treat with an afternoon cup of tea. I ended up dividing my dough in half, making one dozen with chocolate chips and one dozen with raisins. They are sweeter than a normal bread, but you don't feel like you are eating all sugar for breakfast! But I will note that I added a lot of icing to them because it was so good! These were great as is but next time I will add some citrus zest to the dough, or even some ground gloves or allspice, to pack in even more flavor. Enjoy!
Hot Cross Buns
from BakingDom
Yield: 24 buns (recipe can be cut in half easily)
**To halve the recipe, reduce the flour to 2 1/2 cups and the yeast to 1 1/4 tsp, but still use 1 whole egg. Divide the remaining ingredients in half normally.**
Ingredients
Buns
  • 4 3/4 cups all-purpose flour
  • 1/2 cup sugar
  • 2 tsp instant yeast
  • 1 tsp cinnamon
  • 1/2 tsp ground cardamom
  • 1/2 tsp salt
  • 1 egg, lightly beaten
  • 1/2 cup (1 stick) unsalted butter, cut into pieces
  • 1 1/2 cups warm milk, divided (use 3/4 cup hot milk, 3/4 cup cold milk)
  • 1/2 cup raisins, currants, or chocolate chips (optional)
  • 1 egg, whisked with a tsp of water for egg wash (optional)
Icing
  • 2 cups confectioners' sugar
  • 3 tbsp unsalted butter, at room temperature
  • 2-3 Tbsp milk
  • 1/2 tsp vanilla extract
  • Food coloring (optional)
Instructions
  1. To make the buns: combine the flour, sugar, yeast, cinnamon, cardamom, and salt in a large bowl and stir to combine.
  2. In a separate bowl, combine the 3/4 cup hot milk with the butter pieces and stir until the butter is melted. Add the 3/4 cup cold milk, then stir in the lightly beaten egg.
  3. Add the milk mixture to the dry ingredients and mix until a dough just forms. Cover with a clean dry towel and allow to rest for 15 minutes. Once rested, add the raisins, currants, or chocolate chips, if using. Transfer the dough to a floured surface and knead until smooth and elastic, about 10 minutes. If the dough is too sticky, add more flour 1-2 Tbsp at a time. If too dry, add more milk.
  4. Transfer the dough to a lightly oiled bowl, cover, and allow to rise for 1-2 hours, or until doubled in size.
  5. Once the dough has risen, spray two 9x13 inch baking dishes with nonstick cooking spray, or line with parchment paper.
  6. Divide the dough into 24 pieces, each weighing 2 ounces.
  7. Gently shape each piece into a smooth, tight boule. Cover with a clean, dry towel and allow to rise for an hour, or until doubled in size.
  8. Preheat the oven to 400 degrees F.
  9. Once doubled, brush with the egg wash.
  10. Bake buns for 15-18 minutes, or until they reach about 180 degrees inside. Allow the buns to cool completely before icing.
  11. To make the icing: cream the butter and sugar together until smooth and fluffy, adding splashes of milk until the desired consistency is reached (the icing should be on the thin side, but not as thin as a glaze).

Wednesday, April 20, 2011

Baked Macaroni and Cheese

A few years ago, Ron started demanding macaroni and cheese at holiday meals. He claims this was a "family tradition" but for the first three years we were dating, macaroni and cheese was NEVER on the table at Thanksgiving, Christmas, Easter, or for any other holiday meal. So, I don't know when this tradition started. His mom got confused when he started demanding it. My mom got confused. And I was also confused. But to shut him up, we all just started buying him frozen boxes of Stouffer's macaroni and cheese and made sure it was around for the holiday spread. Yep, that's how much we all care about his random demands.
I've never made my own macaroni and cheese before. Not sure why, but it's just never crossed my mind to make it. But for some reason, I randomly got a craving and decided I wanted to attempt it. This baked macaroni and cheese was appealing to me because it was a "lower fat" version. But I have to admit that I was not 100% happy with this recipe. That's basically because macaroni and cheese can't be "low fat" without missing serious flavor. This dish needed more cheese. It needed a variety of different cheeses! So I will definitely add Parmesan next time and maybe some white cheddar or gruyere. I guess it will no longer be "low fat" but oh well! However you make the recipe and with whatever cheese you use, it was very easy, creamy, and has the potential to be very delicious; just mix it up a bit!
Baked Macaroni and Cheese
from The Family Kitchen
Ingredients
  • 12 ounces elbow macaroni
  • 1 Tbsp butter
  • 1 Tbsp all-purpose flour
  • 2 cups low-fat milk
  • 1 cup onion, finely chopped
  • 1 pinch paprika
  • 10 ounces sharp cheddar cheese
  • 1 pinch kosher salt 
  • 1 pinch cracked black pepper
Instructions
  1. Preheat the oven to 350 degrees F. Butter the inside of a 3 quart casserole dish.
  2. Cook pasta according to package directions. Drain and set aside.
  3. In a saucepan over medium heat, melt the butter, then add the flour and whisk well for about 1 minute. Then slowly pour in the milk, whisking continuously as you do so. Stir in the onion and paprika and cook for 10 minutes, stirring frequently.
  4. In a large bowl, add the warm sauce, the cheddar cheese, reserving one cup of the cheese for the topping, and the warm pasta. Add salt and pepper to taste and pour everything into the buttered dish and sprinkle the reserved cheddar on top.
  5. Bake for 30 minutes.

Tuesday, April 19, 2011

Browned Butter Birthday Cake

I'm still here! I just took some time away from my blog and cooking because things got a bit busy. We had a house-guest. And there was an Admitted Student Day. And I was preparing for my final advocacy trial. It's amazing how much time can be spent preparing for something. My portion of the trial lasted 30 minutes. Yet, I spent probably about 30-40 hours preparing for it. This is not a joke. Of course, because of all of that (and Mother Nature's crazy abrupt weather changes) I am now sick again! So, the blog is in need of a pick me up and I am posting a delightful treat!
OH my goodness. Wow. This cake was made for Ron's birthday. And it will be made for birthdays to come. It was my first time browning butter. I was standing there for a good five minutes before anything happened. But then it did. And it was life-changing. I'm going to brown butter every single day!!  It smelled amazing. Then it turned into a nutty, caramel smell. And it permeated throughout the entire house. And then I put the cakes in the oven. And they smelled amazing. And then I took them out and set them on the counter to cool. And I guess the cakes smelled so amazing that they attracted our four legged friends. Cali, our sassy little calico cat, was caught on the counter with crumbs on face. She was standing on one of the cakes. I frisked her off, shut the door, and went about my business fully intending to deal with the cake once I was done. Apparently, I should have checked to see if Salem was locked in the kitchen when I shut the door. Because she was. And she too had her share of birthday cake. But her crumbs covered nearly all of her tiny chin. What a messy eater!

The cats ate one half of the cake. And then they ran around the house like they were on drugs. I was highly annoyed, but I chose just to cut off the parts that I knew they had attacked. Honestly, we might have been eating cake that had been stepped on, but we didn't care. This cake was so good. It's no wonder the cats ate so much of it!
Browned Butter Birthday Cake
from Honey and Jam
Ingredients
For Cake
  • 2 cups sugar
  • 4 eggs
  • 3/4 cup browned butter* (see step #3)
  • 1 tsp vanilla
  • 2 1/2 cups all purpose flour
  • 2 1/4 tsp baking powder
For Frosting
  • 5 oz good quality bittersweet chocolate
  • 8 Tbsp butter, at room temperature
  • 3 cups powdered sugar
  • 2 Tbsp baking cocoa
  • 1 tsp vanilla
  • 1/2 tsp cinnamon
  • 4-8 Tbsp milk
Instructions
For Cake
  1. Preheat oven to 350 degrees F. Grease two cake pans or two cupcake pans.
  2. Beat sugar and eggs together until slightly thickened, about one minute.
  3. *Brown butter: Heat pan on medium heat. Cut butter in to pieces and melt in pan. Stir continuously. Butter will begin to foam up. After foam subsides, small brown flecks will start to appear in bottom of pan. Continue stirring, until butter has reached a nice brown color, and a nutty aroma. Turn the heat all of the way down. (This will take anywhere from 5-7 minutes.)
  4. Add milk, browned butter, and vanilla, to sugar and egg mixture. Stir just until combined.
  5. Add flour and baking powder, beating until well mixed -- about one minute. Do not over mix.
  6. Bake in preheated oven. For cake, bake for about 30 minutes. For cupcakes, bake for about 20-22 minutes. When done, the top will be springy to touch and a toothpick inserted into the center will come out clean.
  7. Cool completely before frosting.
For Frosting
  1. Melt chocolate in a double boiler and allow to cool to room temperature.
  2. Beat in butter until creamy.
  3. Add powdered sugar, baking cocoa, cinnamon and vanilla.
  4. Slowly beat in milk 1 Tbsp at a time until you reach desired consistency.

Monday, April 11, 2011

Thin Crust Pizza

Ron recently had a birthday. Yay! Happee Birthdae, Roonil!! (Our inside Harry Potter joke). This will be his last year in his 20's. I am so proud of him and what he has accomplished in the 7 years that we have known one another. If you don't know already, Ron and I are going to be moving to Seattle in June for his job. It's an amazing opportunity for him that demonstrates how successful he is. <3
So for Ron's recent birthday, I decided to mix up some pizza dough. Ron and I love thin crust pizza. Love, love, LOVE it. We love the way it bends, the way it folds, the way it tastes. Yum! So I knew that this was going to be the best birthday celebration dinner. We had made the dough in the past and knew that it turned out delicious. We made our own delicious pizza sauce (recipe below) and rolled out the dough. Now, I will caution that the dough can get slightly sticky. Ours did rip, but if you have adequate space in your kitchen, you should be fine.

Overall, birthday dinner turned out to be a success. We both love the sauce, the addition of parmesan cheese, and the crust. The crust is so different compared to the thicker crust that we normally eat. We both rate the meal an A+. Enjoy!
Thin Crust Pizza
Annie's Eats
Ingredients
For Crust:
  • 3 cups (16 1/2 oz) bread flour
  • 2 tsp sugar
  • 1/2 tsp. instant yeast
  • 1 1/3 cups ice water
  • 1 Tbsp vegetable oil
  • 1 1/2 tsp salt
For Sauce:
  • 1 (28 oz) can whole peeled tomatoes, drained
  • 1 Tbsp extra virgin olive oil
  • 1 tsp red wine vinegar
  • 2 cloves garlic, minced or pressed
  • 1 tsp salt
  • 1 tsp oregano
  • 1/4 tsp ground black pepper
For Topping:
  • Olive oil, for brushing
  • 1/2 cup (1 oz) finely grated Parmesan cheese
  • 2 cups (8 oz) shredded mozzarella
  • Olives, green pepper, onion, Pepperoni, Salami, or other toppings as desired
Instructions
For Dough
  1. Combine the flour, sugar, and yeast in the bowl of a food processor fitted with the metal blade. Pulse just to combine. With the machine running, add the ice water through the feed tube and process just until the dough is combined and all of the dry ingredients are incorporated, about 10 seconds. Let dough rest for 10 minutes. 
  2. Add the oil and salt to the dough.
  3. Process until the dough forms a smooth, tacky ball that clears the sides of the bowl, about 30-60 seconds. Remove the dough from the bowl, knead briefly, about 1 minute. Transfer to a lightly oiled bowl, cover with plastic wrap and refrigerate for at least 24 hours and up to 3 days.
For Sauce
  1. Combine all ingredients in a food processor. Blend until smooth, about 30 seconds. Transfer to a bowl and refrigerate until ready to use.
For Pizza
  1. One hour before baking the pizza, adjust an oven rack to the second highest position and place a baking stone on the rack to preheat. Preheat the oven to 500 degrees F. 
  2. Remove the pizza dough from the refrigerator and divide in half. Form each half into a ball and place on a lightly oiled baking sheet. Spray the dough balls lightly with cooking spray. Cover loosely with plastic wrap and let sit at room temperature for one hour.
  3. To assemble the pizza, transfer a dough ball to a well floured work surface and flatten into an 8-inch disk, leaving a slightly thicker edge around the rim. Carefully transfer to a pizza peel and using your hands, gently stretch the dough to a 12-inch circle. 
  4. Lightly brush the thicker edge of the disk with olive oil. Spread 1/2 cup of the pizza sauce over the dough. Sprinkle evenly with the grated Parmesan and the shredded mozzarella. Sprinkle additional toppings on pizza, as desired. Carefully transfer the pizza to the preheated baking stone.
  5. Bake until the cheese is bubbling and slightly browned, 10-12 minutes. Let cook for about 4 minutes before slicing and serving. Enjoy!

Saturday, April 9, 2011

Chicken and Sweet Potato Stoup

Although "stoup" is technically considered a winter comfort food, this one could easily be enjoyed during the spring. This was an awesome meal and a very unique soup recipe. I loved the addition of chipotle peppers and white wine. The recipe came from an episode, "Southwest Supper", of Rachael Ray's 30 Minute Meals. The peppers up the ante from your traditional chicken soup. Add more to kick it up a notch. This quick and yummy recipe does not disappoint. Enjoy!
Chicken and Sweet Potato Stoup
Rachael Ray
Yield: 4 servings
Ingredients
  • 2 Tbsp vegetable oil
  • 2 medium carrots, peeled, sliced in half and cut into half-moons
  • 2 ribs celery, diced
  • 1 medium onion, diced
  • 2 gloves garlic, minced
  • 1-2 chipotle peppers, minced, plus spoon of sauce from chipotle pepper can (adjust to your preferences because these babies are spicy!)
  • salt and pepper
  • 1 tsp dried thyme
  • 1 tsp roasted cumin
  • 1 tsp garam masala
  • 1 bay leaf
  • 1 cup dry white wine
  • 5 cups chicken stock
  • 1 large sweet potato, cut into bite sized pieces
  • 1 lb cooked chicken, diced into bite sized pieces or shredded
  • 4 scallion, thinly sliced
  • 1/4 cup chopped cilantro
  • sour cream, if desired
Instructions
  1. Heat a large soup pot over medium-high heat.  Add 2 Tbsp oil to pan.
  2. Stir in carrots, tossing to coat with oil and saute for 2-3 minutes.
  3. Add celery and onion to pot, saute for 2-3 minutes until softened.
  4. Add garlic, chipotle peppers, and chipotle sauce; stir.
  5. Season the vegetables with salt and pepper, thyme, cumin, garam masala, and toss in bay leaf.  Stir constantly for 1 minute.
  6. Stir in 1 cup of white wine; reduce for about 1 minute.
  7. Add 5 cups chicken stock.  Place cover on soup pot and turn the heat up to High.  Bring the soup to a boil, remove cover, and simmer for 10 minutes.
  8. Stir in sweet potato pieces and simmer for 5 minutes, or until potatoes are tender.
  9. Stir in cooked chicken.  Simmer for 1 minute to heat through.
  10. Remove pot from heat.  Stir in sliced scallions and cilantro.
  11. Serve with a dollop of sour cream, if desired.  Enjoy!

Thursday, April 7, 2011

Spring Pappardelle with Spinach, Herbs and Ricotta

SPRING IS HERE! YAY! And I think it is here to stay for good. Every morning, I have been up at 6 a.m., going for my sunrise walks and just happy as can be!
With the arrival of spring, it's time to start posting some light, fresh, and flavorful spring meals on here. I still have plenty of winter posts to make so they will be mixed in. But I had to celebrate the beautiful weather by posting a recipe for a delicious, spring meal.

This meal was on the cover of this month's Cooking Light magazine and I was excited to make it when I first opened my mailbox. It is packed full of fresh herbs, it's quick and easy and just simply delightful. Some of the reviewers did not feel the same, but we totally disagreed. This was delicious! The herbs were prominent but it was a delicious blend of flavor. We enjoyed this with some Oregon Herb bread that I picked up at our nearby Great Harvest Bread Company. We spread the herb bread with fresh ricotta cheese and sprinkled some pepper and parmesan on top. It was divine! Check this recipe out the next time the sun is shining and you are craving a fresh pasta meal!
Spring Pappardelle
Cooking Light
Yield: 4 servings
Ingredients
  • 8 ounces uncooked pappardelle (wide ribbon pasta) (fettuccine will also work)
  • 1 Tbsp salt
  • 1/3 cup whole-milk ricotta cheese
  • 3 cups baby-spinach leaves
  • 1/4 cup chopped fresh chives
  • 1/4 cup chopped fresh flat-leaf parsley
  • 1/4 cup chopped fresh dill
  • 3 Tbsp grated fresh pecorino Romano cheese
  • 2 Tbsp olive oil
  • 1/2 tsp freshly ground black pepper
  • 1/4 tsp kosher salt
Instructions
  1. Prep ingredients ahead of time so they are ready to go before beginning to cook.
  2. Cook pasta with 1 Tbsp salt according to package directions, omitting additional fat. Drain in a colander over a bowl and reserve 1 cup cooking liquid.
  3. Combine 1/2 cup reserved hot cooking liquid and ricotta cheese in a food processor or blender, and process until well blended.
  4. Combine hot pasta, cheese mixture, spinach, and remaining ingredients in a large bowl; toss gently to coat. Add additional cooking liquid to moisten, if needed.

Tuesday, April 5, 2011

Almond M & M Cookies

Short post today. Tis a busy time in my life! This recipe was inspired by a craving for M and M's. I basically went off of random knowledge for the cookie recipe but I was determined to add extra crunch to these cookies and make them more unique than your average M and M cookie. So, I added some crushed almonds and added a smidge of almond extract to bring out the flavor. I was very happy with the results. These cookies puffed up beautifully and never fell flat. The addition of almond was divine! You can easily omit the almonds and just use regular vanilla for a great M and M cookie. Enjoy!
Almond M and M Cookies
from Me
Yield: Half batch, about 2 1/2 dozen
Ingredients
  • 1/2 cup dark brown sugar, packed
  • 1/4 cup granulated sugar
  • 1/2 cup butter, at room temperature
  • 1 egg
  • 1/4 tsp almond extract
  • 1/2 tsp pure vanilla extract (preferably organic; without added corn syrup)
  • 1 1/4 cup all purpose flour
  • 1/2 tsp baking soda
  • 1/2 tsp salt
  • 1 cup M and M's
  • 1/2 cup finely crushed almonds, unsalted
  • coarse sea salt, for sprinkling, optional
Instructions
  1. Preheat oven to 350 degrees F and line baking sheet/s with parchment paper.
  2. In a large mixing bowl, mix butter, brown sugar, white sugar, and egg until combined. Add extract and mix thoroughly.
  3. Stir in flour, baking soda, and salt until just combined.
  4. Pour in M & M's and finely crushed almonds. Fold in M & M's and almonds until mixed throughout.
  5. Drop by rounded teaspoons onto lined baking sheets. Sprinkle with coarse sea salt, if desired. Bake at 350 degrees for 9-11 minutes, or until desired doneness. Cool on baking sheet for a few minutes, then transfer to wire racks to cool completely.

Monday, April 4, 2011

Pasta with Chickpeas and Charred Tomatoes

Yum! What a fantastic pasta dish. I pulled this recipe from a recent Bon Appetit magazine and was super excited with the list of ingredients. Pasta coated with hummus? Yes, please! Charred tomatoes and kalamata olives? And chickpeas? And fresh cilantro? All ingredients that I have in the kitchen at all times - and you might too!  I whipped this up for a quick weekend lunch and the meal was ready in less than 30 minutes. This recipe is also vegan and dairy-free but is substantial enough to please even your meat-eaters. Serve with some pita bread and enjoy!
Pasta with Chickpeas and Charred Tomatoes
Bon Appetit
Yield: 4 servings
Ingredients
  • 8 ounces penne pasta
  • 1/2 cup purchased plain hummus
  • 2 Tbsp olive oil
  • 2 12-ounce containers of cherry tomatoes
  • 1 15-ounce can chickpeas (garbanzo beans), drained
  • 3 garlic cloves, pressed
  • 1 tsp smoked paprika
  • 1/2 cup halved pitted Kalamata olives
  • 1/2 cup chopped fresh cilantro
Instructions
  1. Cook pasta in large pot of boiling salted water until tender but still firm to bite, stirring occasionally. Drain, reserving 1/2 cup cooking liquid. Whisk hummus into liquid.
  2. Meanwhile, heat oil in large heavy skillet over high heat. Add cherry tomatoes; sprinkle with salt and pepper. Cook until blackened in spots, shaking skillet occasionally, about 8 minutes.
  3. Mix in chickpeas, garlic, and smoked paprika. Crush some of the tomatoes to release the juices. Add pasta and enough hummus mixture to coat. Mix in olives and cilantro; season with salt and pepper.

Friday, April 1, 2011

Granola Bars (Maple Pecan Pineapple Raisin)

Every now and then, I stumble upon a recipe that is so mind-blowingly simple. For instance, take these granola bars. For YEARS I have been purchasing store bought granola bars. For YEARS I have been wishing that I could find a granola bar that catered to my specific ingredient preferences. For MONTHS I have been bookmarking random granola bar recipes that I wanted to try. Here we finally have it. The beauty of this granola bar recipe is that it is so simple and can absolutely be adjusted to suit your granola bar desires. I am already daydreaming of different flavors and mix-ins to add into these babies. I think I'll likely spend three times as long at the bulk section of the grocery store next time I am there.
Granted, they won't last as long as the store-bought versions do. But, I am absolutely OK with this! The basic formula is pretty simple and SO easy to adapt:

Rolled Grains (2 1/2 cups total): Old Fashioned Oats, Rye flakes, Barley flakes, etc.
Nuts, Seeds and Spices (1 cup total): Almonds, walnuts, pecans, sunflower seeds, cinnamon, ginger, vanilla extract, etc.
Sticky Sweetener (1/3 cup + 1/4 cup total): Honey, Molasses, Agave, Maple Syrup, etc.
Dried Fruit (1 cup total): Raisins, Dates, Cranberries, Pineapple, Cherries, etc.
Binder (1 cup total): Apple butter, Peanut Butter, Almond butter, Unsweetened applesauce, pureed dried fruit, etc.

This was the combination that I tried the first time I made them. They were pretty sticky and sweet, but totally delicious!
Maple Pecan Pineapple Raisin Granola Bars
inspired by Brown Eyed Baker, from Good Life Eats
Ingredients
  • 1 cup unsweetened applesauce
  • 1/3 cup honey
  • 1/4 cup maple syrup
  • 1 tsp cinnamon
  • 1 tsp allspice
  • 1/2 tsp maple extract
  • 3 cups oats
  • 3/4 cup pecans
  • 1/2 cup dried pineapple
  • 1/4 cup golden raisins
Instructions
  1. Preheat oven to 325 degrees. Line a 8x8 baking pan with parchment paper.
  2. Whisk applesauce, honey, syrup, spices, and extract (Sticky and Binder ingredients) in a large bowl.
  3. Stir in your oats (Rolled Grain ingredients) thoroughly mixing to moisten completely.
  4. Mix in your nuts and dried fruit.
  5. Firmly press mixture in your parchment lined baking pan. Bake for 25 minutes.
  6. Place baking pan in freezer to firm for 1 hour.
  7. Remove the pan from the freezer, remove bars with parchment, and cut. Store in an airtight container for up to one week.