Search My Blog!!

Tuesday, June 29, 2010

Chubby Hubby Bars w/ M&M Pretzels

Ron and I are trying to cut back on sweets.  Naturally, I made a dessert.

I've been slacking off in the kitchen lately.  Every time I go to cook, I just don't want to.  I know why.  I want summer food.  Summer food = stuff cooked on the grill.  We really need to get out of this hellhole and into our new house so we can start grilling.

But, I've also been struggling trying to come up with ideas.  Despite the cabinet full of cookbooks and cooking magazines.  And despite the 3,000+ recipes I have bookmarked online.  I can't seem to find anything that I want to actually eat.  Nothing appeals to me.  Turning to Ron is not helpful.  I get nothing when I ask.  So, desperately, I asked if he had been craving any type of dessert.  He said no; he's been trying to cut back.

30 seconds later, after careful thought, Ron then said, "But, I did just buy that large bag of M&M Pretzels for baking purposes."  I had to giggle to myself.  What a way to create an excuse to eat some sweets!

I saw the M&M pretzels in an ad and was dying to try them.  M&Ms... and pretzels????  Oh my!  All we need is peanut butter and my life would be complete.  And, after biting into one of these bars, my life is complete.

I changed up the recipe from Cake Batter and Bowl to try and accommodate this candy.  I'm not quite sure if it worked (I used an 8x8, instead of a 9x13) because there was a bit of underbaking that occurred.  But, I can likely blame this on my oven because it went up & down for a good 30 minutes.  I'm pretty sure this is my last baking project in this place.  I simply can't deal with this oven anymore.  In any event, these were really, really, very, very good (even if it was all gooey in some places)!
Chubby Hubby Bars w/ M and M Pretzels
from Cake Batter and Bowl
Ingredients
  • 1 cup unsalted butter, softened
  • 2 cups packed light brown sugar
  • 2 large eggs
  • 1 1/2 cups creamy peanut butter
  • 1 teaspoon vanilla extract
  • 3 cups all-purpose flour
  • 2 teaspoons baking powder
  • 1 teaspoon salt
  • 1 cup mini pretzels, coarsely chopped
  • 1 cup M&M pretzel candy, coarsely chopped
Instructions

  1. Preheat oven to 350˚F. Mix butter, sugar, eggs, peanut butter, and vanilla extract together in a large bowl. 
  2. Mix in flour, baking powder, and salt. Spread half the dough in a greased 13×9-inch pan. Sprinkle pretzels and M&M Pretzels evenly on top; drop remaining dough in chunks on top and spread evenly, until all the pretzels and candy pieces are covered. 
  3. Bake at 350˚F for 23 to 28 minutes or until a toothpick in the center comes out clean. 
  4. Cut into 32 bars after the pan reaches room temperature.

Sunday, June 27, 2010

Olive Oil Tomato Basil Fettuccine

I love feeling connected to an enormous community knowing that I share a common bond with millions of other people in the world.  I love being involved in an activity that clears my brain and helps me feel accomplished every single time I place one foot in front of another.  I just love to run.  I love planning out routes.  I love researching new shoes.  I love meeting new running friends.  I love perusing running race expos.  I love thanking the volunteers and race organizers for their amazing help.  But, most of all, I love sitting inside on a beautiful day, looking out at the sun, and counting down the minutes until I can go out for my almost-daily run.  In my life, a day without running is like a day without air.

Some people find this weird.  "You're not even fast."  "You're a middle of the packer."  "You're constantly injured."  "You're going to need a hip or knee replacement."  "What benefit does running give you?"

The truth is: (1) No, I am not fast.  I am comfortably paced.  (2) Indeed I am a middle of the packer, sometimes even a back of the packer.  (3)  I am constantly injured, but I can manage my injuries.  (4)  No comment.  (5)  I cannot think of anything that running doesn't do for me.  And really, #5 is the only one that matters.

Running is my therapy.  It gives me, a slow middle of the packer with relentless injuries, a sense of purpose.  There are so many people out there in this world that can't run; that can't be active for one reason or another, so every single time I am out there, I am reminded of this.  I run because I can run.  But more importantly, I run because I smile when I run.  Well, most days.

Running endurance events has become increasingly popular over the past decade.  When I signed up for my first marathon back in 2006, I had absolutely no idea about the running community that existed out there.  Hundreds of thousands of people run half-marathons and full marathons each year.  Millions more are accomplishing shorter 5k and 10k races.  And, I find it pretty damn awesome that some of those folks are famous chefs.  Did you know that Gordon Ramsay is an avid marathoner and has finished the south Africa 54-mile Comrades ultramarathon 3 times?  That, is impressive.

Runners obsess over carbs during their training regime and before the big event.  It's fitting because running burns nearly 100 calories (this is an approximate number for the average person, your specific number will vary for age, sex & size) for each mile.  If you're out there for 26.2 miles, that's nearly 2,600 some calories burned, at a minimum, just for the race alone.  You better be eating right, and you better be refueling/rehydrating right, or you're not going to be going anywhere.

I'm at about week 4 now for my training for the upcoming Twin Cities marathon.  At the same time, I'm training parallel for the upcoming Disneyland Half-Marathon in September.  The whole family is heading out to participate.  Mom and I will be completing the 5k on Saturday.  Then Dad, Erica, Erica's boyfriend Bo, Ron, and I will be completing the half-marathon on Sunday.  It's Ron's first endurance running event, so we're celebrating our weekly weekend long runs with carb-filled pasta dinners.  This one is incredible.  I'm going to toot my own horn here about 6 times because I basically prepped the recipe all by myself.  Granted, I had help from some athletic chefs from a cookbook titled, The Athlete's Palate Cookbook.  But, the recipe I ultimately came up with was kind of my own measurements and ingredients.

The pasta was purchased at the farmers market this past weekend.  Holy buckets, it's amazing.  I highly recommend checking out your specialty section of the grocery store to find some kind of fresh, unique pasta.  Please, PLEASE, PLEASE do not use boxed pasta for this meal.
Olive Oil Tomato Basil Fettuccine
adapted from a number of places
Ingredients
  • 8-10 oz. cooked chicken, chopped into bite sized pieces
  • 2/3 cup sun-dried tomato halves
  • 1 cup hot water
  • 8 oz. fresh pasta (We use the Sunrise Creative Gourmet Tomato Basil Fettuccine)
  • 1/4 cup chicken broth
  • 3 T olive oil
  • 1 clove garlic, minced
  • 1 t dried basil
  • 1 t minced onion
  • 1/4 t freshly ground black pepper
  • salt
  • 1/8 t red pepper flakes
  • 1/4 c grated parmesan cheese
  • 2 T pine nuts
Instructions
  1. Cook chicken (I used a boil method, but you can prep however you wish).  Chop and set aside.
  2. Place sun dried tomato halves in bowl and pour hot water over tomatoes.  Cover and let sit for about an hour, or until tomatoes are soft.
  3. In the last few minutes of the chicken, cook pasta according to package directions, to al dente.
  4. While pasta is cooking, whisk chicken broth, olive oil, garlic, and seasonings in a large bowl.
  5. Drain tomato halves and mix in bowl broth/oil blend.
  6. Stir chicken in broth/oil blend.
  7. Once pasta is cooked, drain and transfer to bowl with tomatoes, chicken and broth/oil.
  8. Immediately stir in 1/4 c grated cheese, stirring to coat all ingredients.
  9. Serve in bowls and sprinkle with pine nuts.

Friday, June 25, 2010

Chicken Parmesan Meatloaf

Chicken parmesan is one of my favorite italian meals.  So, after the chicken parm burgers, it's only fitting that I found yet another way to eat it.  I follow Joelen's blog so when I saw it appear on my iGoogle, I knew I had to make it.  She has a great blog and always gives instructions on how to store food for later use.  Very convenient!

This meatloaf did not disappoint.  It was incredibly delicious and both Ron and I were bummed that we didn't have more.  I had mixed it up before we went on a jog so we could come home and shove it in the oven.  Ron's been working late, so our dinners have been occurring around 8:30-9ish, so I didn't have time to prepare a side.  However, I think some baked potatoes and zucchini would taste very good with this and I'd plan to make that the next time I make this.

P.S. You can probably click on the link below for a much better (and appetizing) picture of this. :)

Chicken Parmesan Meatloaf
from Joelen's Culinary Adventures
Ingredients
  • 1 lb ground chicken
  • 1 egg
  • 1/4 c breadcrumbs
  • 1/2 tsp dried basil
  • 1/2 tsp dried thyme
  • 1/2 tsp dried oregano
  • 1-2 cloves garlic, minced
  • 1 small onion, grated
  • 1/2 tsp salt
  • 1/4 tsp black pepper
  • 1/2 c grated Parm cheese
  • 1/2 c pasta sauce
  • 1/2 c shredded italian cheese blend
  • minced parsley for garnish
Instructions
  1. Preheat the oven to 350 degrees and lightly grease a loaf pan with cooking spray, set aside.
  2. In a large bowl, combine ingredients (from ground chicken through parmesan cheese).  Try not to over handle the mixture (you don't want it getting tough!!) and spread into the greased loaf pan.
  3. Top the meatloaf with the pasta sauce.
  4. Place the filled loaf pan on a baking sheet and bake in the preheated oven for 40-45 minutes.
  5. Remove the pan from the oven, sprinkle with the shredded cheese and place the meatloaf back in the oven until the cheese is melted.
  6. Remove from the oven and rest for 5-10 minutes before serving.  Sprinkle w/ parsley if desired.

Tuesday, June 22, 2010

Sicilian Style Pizza

Of all of the pizzas I've made since I first tried my own, this one is by far my favorite.  I don't always post the pizza recipes because I've never really measured things as I went.  I'd spread some sauce, add some cheese, cut up some veggies, sprinkle some seasoning... But, my food blog tends to give exact measurements, so if I am going to post a recipe, I need to post the measurements.  I kind of feel like pizza is more of a personable thing though.  While one may love pineapple on their pizza, one may not.  So, I love having the ability to adapt the recipe to your preference.

This recipe was too good not to add.  I found it on the back of a Sargento Bistro Blends package.  I had some pizza dough in the freezer from the last time I'd made fresh dough, so I decided to use it instead of making fresh stuff.  I mixed up a pepperoni pizza for Ron, then got to mine.  I didn't use the exact measurements from the Sargento recipe, but I'm including the suggested measurements below.  Mine had about 1/2 the cheese, 2x as many olives and 2x as many peppers.  Yum!  It was seriously awesome.
Sicilian Style Pizza
adapted from Sargento Bistro Blends
Ingredients
  • 1 (12-inch) prepared pizza crust (or use fresh pizza dough)
  • 1/3 cup pizza sauce
  • 1-3/4 cups (7 oz) Sargento Bistro Blends Shredded Mozzerella Cheese with Sun-Dried Tomatoes & Basil, divided
  • 1/2 cup bottled roasted red pepper strips
  • 1/3 cup sliced kalamata olives
  • 1/3 tsp. crushed red pepper flakes
Instructions
  1. Place pizza crust on a baking sheet.  (If using fresh dough, roll out dough and prepare as if using pizza stone or baking sheet.)
  2. Top dough with pizza sauce, 1 cup cheese, pepper strips and olives.  
  3. Sprinkle remaining 3/4 cup cheese and pepper flakes over pizza.
  4. Bake in a preheated 450 degree oven, 8-10 minutes or until golden brown and cheese is melted.

Monday, June 21, 2010

Sweet-Potato Beef Stir-Fry

This meal has the potential to be very good.  I say potential, because ours, failed miserably.  Well, not completely.  But, it did remind me why I don't cook red meat.  I never know how to tell if it's done.  And then, I also seem to surpass that point of "Done; stop cooking immediately!" and then we spend 30 minutes extra during meal time just chewing the tough meat.  I even looked up ways to prevent this from happening.  I still failed.  Argh.  No more beef stir fry for us.

But, the ginger mixed with the asian ingredients was very good on the green beans and sweet potatoes.  So, this is why I'm posting it.  I'm sure there are people out there that actually know how to cook beef correctly.  I highly recommend getting yourself a bottle of sesame oil.  This stuff is awesome!  A little bit goes a long way and truly adds that missing ingredient in stir-fry.  It can be found in your ethnic section of the grocery store.

Sweet-Potato Beef Stir-Fry
adapted from Clean Eating July/August 09, reprinted at Kitchen Goddess
Yield:  4 servings
Ingredients
  • 1 lb eye round beef steak, sliced 1/8-inch thick, then cut into 1-inch strips
  • 1/2 tsp sesame seed oil
  • 1 tbsp unsweetened apple butter
  • 1 tbsp low-sodium soy sauce
  • 1/2 tsp red pepper flakes
  • 2 garlic cloves, crushed
  • 1 1/2-inch slice fresh ginger, crushed
  • 2 cups sweet potato, diced into 1-inch chunks
  • 1 cup green beans
  • 1 tsp olive oil
  • 1 medium onion, thinly sliced
Instructions
  1. In a large bowl, mix beef with sesame seed oil, apple butter, soy sauce, red pepper flakes, garlic and ginger.  Set aside.
  2. Bring 3 cups water to boil in a medium pot over high heat.  Add sweet potato, cook for 5-7 minutes, until soft but firm.  Remove sweet potato with slotted spoon; do not drain water.  Return water to a boil.  Add beans and boil for 4 minutes, until soft but still firm.  Drain.
  3. Add olive oil to a large skillet over high heat.  Once hot, add beef mixture and onion, tossing quickly until done, about 3-4 minutes.  Then toss in sweet potatoes and beans.  Cool for 1 more minute.  
  4. Serve!

Sunday, June 20, 2010

M&M Cashew Pretzel Bars

We were heading out to meet up with some friends for a minor league baseball tailgate the other night in St. Paul and I didn't want to go empty handed.  Fortunately, I have a number of recipes on hand that are classified as quick and easy.  I also have an odd assortment of baking ingredients in my kitchen at all times, so I was grateful that all of these things were in the house.

The only thing that wasn't so "quick" about these was the cooling time.  You'd likely have to make these about 3 hours or so before you plan on serving them to make sure that they were ready.  But this recipe was 110% easy and 120% awesome.

They were delicious.  The sweet of the chocolate mixed with the salty of the pretzels and nuts is a winning combination.  Plus, I came home with an empty container.  I always look at that as a bonus.  If I came home with an entire container, then I'd be worried.  But, how could you possibly go wrong with anything made with butter and sugar?
M&M Cashew Pretzel Bars
recipe from Cake Batter and Bowl
Yield:  16 squares
Ingredients
  • 1/2 cup butter, softened
  • 1/2 cup packed brown sugar
  • 1 cup AP flour
  • 1/2 tsp baking powder
  • 1 cup coarsely chopped pretzels
  • 3/4 cup semisweet chocolate chips
  • 2 Tbsp. milk
  • 1/2 cup whole cashews
  • 1/2 cup M&Ms
Instructions
  1. Preheat oven to 350 degrees F.
  2. Mix butter, brown sugar, flour and baking powder in a medium bowl until smooth.
  3. Mix in chopped pretzels.
  4. Grease and line an 8x8-inch pan with parchment paper and spread dough evenly across the lined pan.
  5. Bake for 15 minutes at 350 degrees F or until lightly browned and set.
  6. Cool for 15 minutes.
  7. In a small bowl, microwave chocolate chips and milk on High 1 minute, stirring after 30 seconds; stir until chips are melted and mixture is smooth.
  8. Spread ganache over cooled bars and top ganache evenly with cashews and M&Ms.
  9. Place bars in fridge for an hour or until ganache is set.  
  10. Cut into 16 bars.

Friday, June 18, 2010

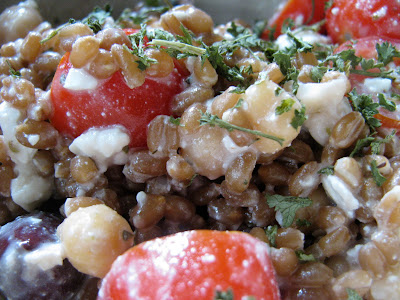
Greek Wheat Berry Salad

First things first, I'd like to address something important here.  I've been noticing several grammatical errors in my blog posts.  As of today, I have decided that I don't care.  I am normally one to cringe when I see a comma in an inappropriate place, but I have, decided that I, will use as many, commas as, I want.,,,,,  This is my way of rebelling.

When I cook and bake, the kitchen turns into a disaster.  I don't put ingredients away as I go.  I don't clean up things that spill all over the countertops.  It's a terrible habit that I really need to break.  I always hear chefs say, "A clean cook is a happy cook."  Indeed, I am not a happy cook at the end of this process.  So, before I sit down to eat, I normally take the time to return the ingredients to their respective positions in the kitchen and wipe down the counters.

But, there are times that I taste the meal, and the meal is so good that I immediately fix myself a bowl to eat, leaving the kitchen in complete disarray.  This is exactly what happened with this greek salad.  There were dribbles of tahini and red wine vinegar all over the countertops, the remnants of several wheat berries left on the saucepan.  But, I sat, happily, eating my lunch and savoring every single bite... as brine from the empty container of kalamata olives slowly dripped onto the floor.

Note:  it can be a bit salty w/ the olives and feta.  But, considering I have a low-sodium count as it is, I was perfectly fine with this.  Also, a cucumber was meant to go into this recipe, but you can't see it in the photo because a cucumber was not included in mine.  That's another story...
Wheat Berry Greek Salad
recipe from Bitchin' Camero
Ingredients
  • For Dressing
    • 1/4 cup olive oil
    • 3 T red wine vinegar
    • 1 t salt
    • juice of 1/2 a lime
    • 2 T tahini
    • 1 t dried oregano
  • For Salad
    • 1 pint grape tomatoes, halved
    • 1 large cucumber, diced
    • 1 bunch green onions, thinly sliced (or 1/4 of a red onion, thinly sliced)
    • 1 15 oz. can chickpeas, drained and rinsed
    • 2 cups cooked grains (I used wheat berries)
    • 1/4 lb feta cheese, crumbled
    • 1/2 c chopped kalamata olives
Instructions
  1. Place all of the ingredients for the dressing in a bowl and whisk together.  Set aside.
  2. Combine the remaining ingredients, drizzle with the dressing and toss until thoroughly combined.

Thursday, June 17, 2010

Unbirthday Cupcakes

If you're looking for any type of nutritional value, you're not going to find it here.  Granted, most baking recipes fall a bit away from "nutritional", but this one doesn't even use any "fresh" baking ingredients.  There's a lot of processed stuff in there, but it's ok, because it's my unbirthday.

Today is a special unbirthday.  You see, my grade for constitutional law appeared on my transcript.  And, it was not pretty.  Apparently, someone forgot to notify my professor to factor my unbirthday into their grading.  Truthfully, after my con law exam experience (involving a 24-hour long total meltdown in which I questioned my sanity several times), the grade that I received is a blessing.  I was actually convinced that I would have to retake the course, which I don't.  But, it is still depressing and my worst grade of law school.  Really, really depressing.  Also depressing is the nasty weather we've been having here.  And the fact that I've been dealing with some strange spring/summer/why is it cold and rainy flu'ish situation.  Something else depressing is the fact that I am not in Orlando partaking in the grand opening of the WWoHP festivities.  So, I decided that my life (and Salem's life; she's been depressed too) would be a little bit brighter with some cupcakes and my unbirthday was the perfect reason to have them.

Unbirthdays are kind of hard to celebrate.  You want to be able to do the unbirthday justice, but seeing as there are 364 of them, you can't exactly be indulging in a piece of cheesecake every single day.  I mean, you can, but I can't.  I gain pounds within seconds of eating a cookie.  That's why I like Hungry Girl.

Several years ago, I discovered Hungry Girl.  I started receiving her daily emails when she was relatively unknown and unpublished (she has since published several fantastic cookbooks).  I found her recipes fun and inventive.  The oreo pie remains one of my favorite treats, I am a huge fan of the butternut squash fries and I love using pumpkin and applesauce while baking.  I don't follow her recipes often, but every now and then I stumble upon something fantastic and decide to make it.  These were perfect to satisfy my funfetti cupcake craving.  I ended up making 12 so, if we were counting calories here, each cupcake would be around 115 some calories for the way I made them.  Not bad for a sweet treat that tastes exactly like its 300 calorie evil twin.  The recipe may seem kind of strange and I'm now left with 1/2 a box of cake mix, but this simply means that it might be time to make some more cupcakes.  Thank goodness, I have another unbirthday today.
Happy Unbirthday Vanilla Cupcakes
from Hungry Girl
Yield:  Her recipe says 9, I got 12 and they were practically overflowing!
Ingredients
  • Frosting:  
    • 1 1/4 cups cool whip free, thawed
    • 1 1/2 tbsp sugar free, fat free instant pudding mix (I used white chocolate)
  • Cupcakes:
    • Half of an 18.25 box (about 1 1/2 cups) of moist-style yellow cake mix (I used Betty Crocker butter yellow)
    • 3/4 tsp baking powder
    • 1 cup Sprite Zero (or another diet lemon-lime soda; I used diet 7-up) at room temperature
    • 1/2 tsp. vanilla extract
    • 1/2 cup liquid egg whites (or about 4 raw egg whites)
    • 3 tbsp. rainbow sprinkles, divided
Instructions
  1. Preheat oven to 350 degrees.
  2. For Frosting:  Combine cool whip and pudding mix in a bowl, mixing until smooth.  Cover and keep in fridge until ready to use. 
  3. Cupcakes:  In a large bowl, combine cake mix with baking powder and mix until no lumps remain in batter.  Add soda and vanilla extract.  Stir/whisk batter until smooth.  Set aside.  In a separate bowl, whip egg whites with a hand held mixer on medium until whites are fluffy, about 1-2 minutes.  Gently mix egg whites into the cake batter until thoroughly combined.  Mix in about 2 tbsp. sprinkles.
  4. Line cups of a 12-muffin pan with baking cups and spray with a nonstick spray.  Evenly distribute among the cups (scraping to grab the sprinkles that have sunk to the bottom).  (I started with 9 but realized I had enough batter for 12.)  The cups will be very full!
  5. Bake for 15-17 minutes, until toothpick inserted in the center comes out fairly clean.  Set aside and allow them to cool completely.  
  6. Once cupcakes have cooled, spread frosting on them and top with remaining sprinkles.

Wednesday, June 16, 2010

Hawaiian Chicken Burger

Yep, another "burger" for you.  I'm having a ball making things that are round and can easily be shoved in the broiler.  These were much different in flavor compared to the chicken parm burgers that we ate recently.  Ron preferred these ones.  I think I did too.  They were delicious.  Ron said they had a "tex-mex" flavor.  I guess I could kind of see it with the soy/cumin combination, but it's a stretch.  In any event, these were very, very good.

We used the broiler method again that we had used for the chicken parm burgers; about 9 minutes on one side, flip, 5 minutes remaining w/ cheese coming on at about minute 4:30.  I didn't have any pineapple rings to grill, so I just used the chunks I had in the fridge.  I also cut the recipe in half (the original, reflected below) calls for 2 pounds of ground chicken.  I did, however, leave the mix-ins at the same measurements, solely because I was looking for more flavor.

Serve with whatever side you wish.  Due to the increase in my pants size as of late, I ate carrot sticks.  Oh joy.
Hawaiian Chicken Burger
adapted from Homemade by Holman
Yield:  3-4 burgers
Ingredients
  • 1 pound ground chicken
  • pineapple
  • pepperjack cheese slices
  • hamburger buns
  • 1/4 cup low sodium soy sauce
  • 1 tsp smoked paprika
  • 1 tsp chili powder
  • 1/2 tsp seasoning salt
  • 1/2 tsp ground cumin
  • 1 clove garlic, minced
Instructions
  1. Combine ground chicken, soy sauce, paprika, chili powder, seasoning salt, cumin, and garlic.
  2. Lightly mix with your hands and divide evenly into 3-4 patties; refrigerate about 30 minutes.
  3. Grill burgers over medium heat coated with cooking spray, about 6 minutes per side.  (They should flip easily when ready, if not, leave them on for another minute.)
  4. Top with cheese slice for the last 1-2 minutes of cooking time to melt.
  5. Grill buns and pineapple rings, if desired.  To grill pineapple rings, grill directly on the grates over medium heat, carefully turning after 1-2 minutes.  If you're using pineapple chunks, thread until skewers and grill over medium heat, carefully turning after 1-2 minutes.

Monday, June 14, 2010

Chocolate Bread

Well, hmm.  I have to admit that this looked a lot like a brownie whenever it was mixed together and when it came out of the oven.  And, I guess it kind of tasted like a brownie.  But, I'm calling it bread, because David Lebovitz did.  I used yeast and bread flour.  Bread uses those ingredients.  Plus, it cut like a bread and didn't have the enormous amount of granulated sugar that brownies normally do.  So, yep.  It's bread.  It's bread even though it has 6+ ounces of dark chocolate.  And a 1/2 cup of toasted hazelnuts.

And bread can be eaten for breakfast.  With a smidgen of cherry preserve or melted butter.  And a side of fresh fruit to go with your morning coffee.

And bread can even be eaten for lunch.  It can be smeared with a dollop of no-oil almond butter and topped with fresh raspberries, then grilled into a panini.  Bread, raspberries and almond butter made with no oil?  Yes.  This sounds like a healthy lunch!

And bread can even be eaten as a midnight snack with a healthy banana for that potassium boost needed to fall asleep.

Yep.  This is definitely bread.  And now I am inspired to make some type of brownie with fresh cherry mixed inside.
Chocolate Bread
David Lebovitz
Yield:  1 delicious Loaf
Time:  About 3.5 - 4 hours
Ingredients
  • 3/4 cup milk, heated just until tepid
  • 1 envelope active dry yeast
  • 6 tbsp sugar
  • 4 tbsp butter
  • 3 ounces bittersweet or semisweet chocolate, coarsely chopped
  • 1 1/2 tsp instant coffee or espresso powder (optional)
  • 1 large egg
  • 1/2 tsp vanilla
  • 3/4 tsp sea salt
  • 2 cups bread flour
  • 1/4 cup unsweetened Dutch-process cocoa powder
  • 3/4 cup chocolate (either chips or coarsely chopped chocolate; I used ghiradelli dark cacoa chips)
  • 1/2 cup toasted pecans, walnuts, almonds, or hazelnuts, coarsely chopped (optional)
Instructions
  1. In a bowl of a stand mixer, or a large bowl, sprinkle the yeast over the milk.  Add 1 tbsp of sugar, then set aside in a warm place for 10-15 minutes, until bubbles form on the surface.
  2. While the yeast is activating, in a small saucepan, melt the butter and 3 ounces of chocolate over a pan of barely simmering water.  Stir occasionally, until the chocolate and melted and the mixture is smooth.  Remove from heat.
  3. Once the yeast mixture is frothy, mix in the remaining 5 tbsp of sugar, instant coffee (if using), the egg, vanilla, and sea salt.
  4. Stir in half of the flour and cocoa powder, then the melted butter and chocolate, then the remaining flour mixture, stirring until well-incorporated.  If using a stand mixer, attach the dough hook and beat for 5 minutes, until smooth.  If making by hand, mix vigorously with a flexible spatula for the same amount of time.  The dough will seem quite moist, resembling sticky brownie batter when ready.
  5. Cover the bowl and let rise in a warm place for 2 hours.
  6. Butter a 9-inch loaf pan.
  7. Stir in the chopped chocolate and nuts, if using.  Then use a spatula to fold the dough over on itself in the bowl for about 30 seconds, then transfer it to a buttered pan, pressing a bit to spread it to the corners.  Let rise in a warm place for one hour.
  8. Ten minutes before you're ready to bake the bread, preheat the oven to 350 degrees F.
  9. Bake the bread for 35-40 minutes, until it feels done and sounds hollow when you tap it.  You can stick an instant-read thermometer in the bottom if you're unsure; the bread is done when the temperature reads 180 degrees F.

Sunday, June 13, 2010

Calico Burgers

We had an indoor barbeque the other night.  I've been craving my annual hamburger.  Come to think of it, I've also been desperately craving a trip to the beach; something is clearly off in my life.  Anyway, this entire meal was cooked indoors.  Not really by choice, but the a**hole apartment complex decided to screw with the outdoor grills.  So, Ron went down to grill and came back in about 10 minutes with raw burger patties.  The look on his face told me not to ask questions so I pulled out the grill-pan.  It worked quite nicely, until it was time to clean.  I hate cleaning cast-iron kitchenware.

The burgers were great.  I don't know why these are called Calico burgers.  We have a calico cat named Cali.  I can assure you that she was not harmed in the making of these burgers.

I picked up some grass-fed ground meat at Byerly's and found a recipe that uses rice and green pepper in the mixture.  What a way to get Ron to eat vegetables!  Dice them up into tiny pieces and mix it with a "healthy" red meat!  I used a wild rice instead of white and I think it added a fantastic nutty texture to the burgers.

I also made the burgers with some corn on the cob (made on the stove) and some sweet potato wedges.  The wedges were pretty mushy (not like crunchy fries) but I loved them like this.  I've had some sweet potatoes to use and this was a great way to add to our burgers.  I really enjoyed the sauce that went with the burger, but I actually loved it on the sweet potatoes.  You can't really tell what the burger looks like, but just use your imagine.  It looks like a burger.  With stuff in it.
Calico Burgers
Taste of Home
Yield:  4 servings
Ingredients
  • For Burgers:  
    • 1-1/2 pounds ground beef
    • 1/2 cup cooked rice
    • 1/4 cup chopped onion
    • 1/4 cup chopped green pepper
    • 1 tbsp dried parsley flakes
    • 1 tsp salt
    • 1/4 tsp garlic powder
    • dash pepper
  • For BBQ Sauce:
    • 2/3 cup water
    • 1/4 cup ketchup
    • 3 tbsp chili sauce
    • 1 tsp worcestershire sauce
    • 1/4 tsp dried basil
Instructions
  1. In a bowl, combine the ingredients to make the burgers; mix well.
  2. Shape into 4 - 6 oval patties.
  3. Grill over hot heat until meat reaches desired doneness.
  4. For Sauce, combing sauce ingredients in a saucepan; simmer for 15 minutes.  
Sweet Potato Wedges
Rainy Day Gal
  1. Preheat oven to 400 degrees F.
  2. Cut 3 sweet potatoes (washed and dried) in half width-wise and then each half into 8 wedges.
  3. Place wedges in a large bowl.
  4. Drizzle w/ about 1 tbsp olive oil and toss to coat.
  5. Sprinkle on 1/2 tsp salt, 1/2 tsp pepper, and 2 tbsp dry minced onion; toss to ensure an even coating on the wedges.
  6. Place wedges on a baking sheet (don't crowd) and bake for 20-25 minutes until crisped and golden.
  7. Top with 1 1/2 tbsp fresh chopped parsley and serve.  

Saturday, June 12, 2010

Pasta with Cherry Tomatoes and Arugula

Here's another light, quick, and easy recipe. I've been trying to use up some random ingredients in the kitchen and stumbled upon this recipe that would take care of that pint of cherry tomatoes and wilting arugula. When mom was visiting, she asked what arugula was. I didn't have a good answer. It's been mixed in lettuce blends I've had before, but I could never really pinpoint the taste. This recipe really brings out the flavor of arugula. I'll describe it as how I described it to Ron, "A peppery spinach taste." He likes spinach, so now he likes arugula. It definitely does taste like a peppery spinach. It's pretty potent on its own. I discovered this when I tried to make an entire salad out of it (never again), so it's normally mixed with a milder lettuce to enhance the flavor.

This recipe was very good. We both went back for seconds. I added pine nuts. I can't seem to eat pasta without pine nuts. I also added a bit more cheese. With some alterations to the tomato-dressing mixture, it could probably be made with chicken if you're looking for a protein to be mixed in. Time to table was 20-25 minutes. Well worth it.
Pasta with Cherry Tomatoes and Arugula
adapted from Eating for England
Yield: 4-5 hearty servings
Ingredients
  • 1 pint cherry tomatoes, halved if small, quartered if large
  • 1 plump garlic clove, minced or put through a press (more to taste)
  • Salt to taste
  • 1 teaspoon balsamic vinegar (optional)
  • 1 cup arugula leaves, coarsely chopped
  • 1 tablespoon slivered or chopped fresh basil
  • 2 tablespoons extra virgin olive oil
  • 1/4 cup pine nuts
  • 3/4 pound fusille, farfalle, or orecchiette
  • 1/4 cup freshly grated ricotta salata or Parmesan (more to taste)
Instructions
  1. Combine the cherry tomatoes, garlic, salt, balsamic vinegar, arugula, basil, pine nuts, and olive oil in a wide bowl. Let sit for 15 minutes. Taste and adjust seasonings.
  2. Meanwhile, bring a large pot of water to a rolling boil. Add a generous amount of salt and the pasta. Cook al dente, until the pasta is firm to the bite. Drain, toss with the tomatoes, sprinkle on the cheese, and serve,

Thursday, June 10, 2010

Chocolate and Peanut Butter Banana Bites

People are often surprised when they find out that I bake.  I think it's because I come across as relatively healthy.  I think of myself as pretty active, I don't drink or smoke or eat fast food, and I am able to fit into my pants (on most days).  But, I guess it's still kind of shocking, especially to people who have watched me turn down free food more often than not and assume I nibble on lettuce periodically throughout the day.

A lot has changed since we moved to MN.  My food allergies, which used to be pretty lax, have kicked in full-swing.  I have serious food allergies that have a lot of control over my life.  I often turn down food that I haven't made because I simply don't know what is in it, not because I don't want it.  When I cook/bake, I can see the preparation and I can see what ingredients are included in the recipe.  Trust me, I used to eat anything handed to me.  Then, after I first got sick, I realized I couldn't dine out as often anymore :-/  Dining out and eating other people's food has become very problematic in the past few years.  I'm like "that person" who is sending food back all the time.  I feel terrible, because people might be offended when I turn things down, but I really have no other choice.

Anyway, I do have an extreme sweet tooth.  And, I don't see a problem with indulging every single day.  But, I seem to have the ability to indulge sensibly.  I've been blessed with the gift of consuming things in moderation.  I can bake a whole tray of brownies, take one small bite, and be fine with not having anymore.  Unfortunately for Ron, this means he ends up eating 99% of them, but somehow the guy has lost 40+ pounds since we moved here and he started eating everything I make.

Contrary to this blog, my daily indulgences seem to be different from what others might expect them to be.  I get excited when I can have a bowl of berries, mixed with some granola and a few sprinkles of dark chocolate.  My favorite meals look like a rainbow and I have an array of flavors with fruits and veggies on my plate.  I crave water, lots of water, and never alcohol.  So, I guess those reasons might be why my pants still fit.  I also snack often through-out the day and eat something at nearly every hour.  But, snacks consist of apples and giant carrots (Hey... what's up Doc?)  I also spend a lot of time lifting, running, cycling, rollarblading, walking, doing yoga or pilates, swimming, or hiking . . .  I don't normally drive to the grocery store; I walk or bike there.  I don't normally drive to the dentist's office; I walk or bike there.  Do you see where I'm going with this?

So yes, I do still fit into my pants.  But, I'm not saying that my lifestyle is a great way to live life.  I struggle with this stuff, and some days are more difficult than others.  But, here's a brief look at the desserts I eat on a daily basis to satisfy my cravings.
Yep.  Chomp.  Those are my marks from my two front teeth.

Note:  Don't try and trick a non-fruit lover by telling him that these are ice cream balls.  He will take a bite, ask what is in it and if you say custard, he will take another bite then argue that it is not custard.  He will then look at it and scream "THIS IS A BANANA.  BLECK!!" and spit it all over the kitchen.  Ron has had a banana once before in his life.  Since then, he's been wondering for years if he would ever try one again.  Last night, he came to the conclusion that he is content with never eating them again.

Chocolate and Peanut Butter Banana Bites
adapted from (Never Home)maker
Yield:  about 6 servings
Ingredients
  • 1 banana
  • 1.5 squares of bittersweet chocolate, cut into small chunks
  • 3 T creamy peanut butter
  • sprinkle of coconut and almond slivers, if desired
Instructions 
  1. Cut banana into 6 equal pieces.
  2. Place chocolate and peanut butter in bowl and place in microwave for 1 minute.
  3. Remove bowl and stir chocolate and peanut butter until smooth.
  4. Dip banana pieces into melted chocolate and peanut butter until covered.
  5. Transfer banana to tray lined with parchment paper.  
  6. Drizzle more chocolate pb over bananas, if desired.  (You will have some leftover.)
  7. Sprinkle coconut and almond slivers on top, if desired.  (Or use other toppings.)
  8. Set in freezer to firm.  Then, enjoy!

Monday, June 7, 2010

Mini PB Cup Chocolate Cookies

I don't know how to blog.  You'd think I'd have enough brains to figure it out.  But, no.  Somehow, a post I tried putting up today has stored itself under June 1st.  It is, by far, one of the best tasting meals I've made to date so please click here to find an amazing recipe for Israeli Couscous.  Then, make these cookies.
A few years ago, I discovered something amazing at Trader Joe's.  Miniature peanut butter cups.  Whoever invented these things was a genius.  They were also an evil human trying to take advantage of people who love chocolate/pb combos.  These things are so easy to pop into your mouth and think that it is a guilt-free treat.  Then, you get to number 25 and you realize that you've surpassed the guilt-free treat.  Oops.

The other day, I was craving chocolate and peanut butter.  This is not an abnormal craving; it happens daily.  My pb and graham combo sometimes incorporates chocolate.  The loud neighbors were causing a major ruckus downstairs (think picture frames and candlesticks falling over because the child downstairs is running, back and forth, back and forth, back and forth, from the hours of 8am until 10pm) and it was stressing me out.  Ron and I got into our daily spat about this (Me:  WTF is going on; these people suck!!  Him:  You need to chill out.  We have 3 weeks left in this hell-hole, just let it go, it's not worth it.  Me:  Yes, I know but I can't just chill out that easily like you.  Ron:  Just chill out.  Me:  YOU CHILL OUT!!!!)  We need a marriage ref.  Whatever.  In my defense, a leopard can't change its spots.  Though, I do wish I could settle easily.  But, how can you relax when the noise is so terribly bad that you are forced to leave the comfort of your own home just to seek sanity?  (AND, the people should really take this damn kid outside to play.)

Anyway.  I decided to bake.  This calmed me down for a bit.  And, these cookies are great.  I honestly don't think they would work as well with regular peanut butter chips, but you can certainly try.  If you can't find the mini ones (I've only ever seen them at TJ's), then I'd suggest chopping up regular size Reese's cups.  The way the peanut butter melts is the best part of this cookie.  They are so chewy and moist.  Definitely delish.
Mini PB Cup Chocolate Cookies
A Mingling of Tastes
Ingredients
  • 2 c AP Flour
  • 2/3 c. unsweetened natural cocoa powder (I used Hershey's Special Dark)
  • 3/4 tsp baking soda
  • 1/2 tsp salt
  • 1 c. unsalted butter, softened
  • 1 1/2 c granulated sugar
  • 2 large eggs
  • 2 tsp vanilla
  • 2 to 2 1/2 c. mini pb cups, pb chips or choco chips
Instructions
  1. Preheat oven to 350 degrees.
  2. Combine the flour, cocoa, baking soda and salt in a bowl.  Whisk to thoroughly combine.
  3. In another bowl, beat the butter and sugar until light and fluffy.  Add eggs and vanilla.  Beat to combine/fluffy.
  4. Stir the flour mixture into the butter mixture w/ a wooden spoon until all the flour is moistened.
  5. Stir in the chips.
  6. Drop heaping teaspoons of dough onto a parchment-lined baking sheet.
  7. Bake for 8-10 minutes, or until just set.  (They may look slightly undercooked, but they will firm up and edges will crisp as they cool.  They remain slightly moist and chewy.)
  8. Cool for a few minutes on the baking sheet, then transfer to a wire rack to cool completely.

Sunday, June 6, 2010

Sunflower Whole Wheat Quick Bread

Sometimes, the best recipes come from spur of the moment baking sessions when you are trying to use up some ingredients that are about to expire.  I had some buttermilk leftover, some eggs that were nearing their time, and a ton of sunflower seeds that I was itching to use.  I stumbled upon this recipe and knew it would mix up a more than satisfactory quick bread.


The recipe is extremely easy to mix up.  You mix the dry ingredients in one large bowl, mix up the wet ingredients in a smaller bowl (I used a 2 cup pyrex measuring cup) and then you mix and bake.  I love recipes that use one bowl!  It makes for such an easy clean-up which does not come easy when it comes to baking.


The mixture gets pretty tough to mix, but it's supposed to be a thick-oatmeal like consistency when you pour it in the pan.  I loved this bread recipe (even though my oven decided to heat to 450 while baking it, thus causing it to burn a bit).  I've had it for breakfast with some jam and apple butter from a recent Farmer's Market purchase.  I will definitely be making it again.
Sunflower Whole Wheat Quick Bread
adapted from Amanda's Cookin
Yield:  1 9x5 loaf
Ingredients
  • 2 c WW flour
  • 1/5 c AP flour
  • 1/2 c wheat germ
  • 1/4 c sugar
  • 1/4 c packed light brown sugar
  • 1 tsp salt
  • 4 tsp baking powder
  • 1 tsp baking soda
  • 1 c roasted sunflower seeds, plus a handful extra to sprinkle on top of bread
  • 1.5 c buttermilk
  • 2 large eggs
  • 4 tbsp salted butter, melted
Instructions
  1. Preheat oven to 375 F.  Spray a 9x5 loaf pan with cooking spray.  Place prepared ban on a baking sheet and set aside.
  2. In a large bowl, stir together both flours, wheat germ, both sugars, salt, baking powder, and baking soda.  
  3. Stir in 1 cup of sunflower seeds.
  4. In a small bowl, combine the buttermilk, eggs and melted butter.  Whisk until just combined.
  5. Pour the buttermilk mixture into the flour mixture and stir until combined.  (Mixture will be thick and sticky.)
  6. Spoon batter into prepared loaf pan and sprinkle with sunflower seeds.  
  7. Place baking sheet with loaf pan into the oven and bake for 50-60 minutes or until loaf is browned and sounds hollow when tapped.
  8. Cool in pan for 10 minutes, then remove from pan and cool completely on a wire rack.

Saturday, June 5, 2010

Cinnamon Roll Muffins

I made these up for Ron the other day because he seemed kind of bummed that I hadn't made any baked goods (for him) in some time.  He was pretty damn happy when he saw them.  I was pretty damn happy making them.  The smell of cinnamon baking in the oven is up there with my top 10 favorite smells that emanate from the kitchen.  I mixed up a half batch to avoid watching him eat all 12 in one sitting.  Instead, I watched him eat 3 at a time over 2 days.  He even alternated his approach at eating them:  stick on in the microwave to warm up, while waiting, devour one at room temperature, then eat the microwave one, then decide what to do with the third.  

From the small taste that I had, these muffins were pretty dynamite.  The preparation method is pretty unique for a baked good (you place them in a cool oven after a brief rise period), but it is surely a lot less labor intensive than it is to make cinnamon rolls.  (To date, I have attempted 3 times to make cinnamon rolls.  Each one has failed disastrously.)
Cinnamon Roll Muffins
adapted from A Dash of Sass
Yield:  12 muffins
Ingredients
  • Dough
    • 1.5 c AP flour
    • 1/3 c sugar
    • 1/4 tsp salt
    • 4 tsp active dry or rapid rise yeast
    • 2/3 c warm milk (about 100-110F(
    • 3 Tbsp vegetable oil
    • 1/2 tsp vanilla extract
    • 1 large egg
  • Filling/Topping
    • 2 tbsp butter, room temperature
    • 2/3 c brown sugar
    • 3/4 tsp cinnamon
    • pinch ground cardamom
  • Icing
    • 1 cup powdered sugar
    • 1-2 Tbsp milk or cream
Instructions
  1. In a large bowl, combine flour, sugar and salt.
  2. Dissolve the yeast in a measuring cup filled with the warmed milk.
  3. Stir milk mixture, vegetable oil, vanilla extract and egg into flour mixture.  Mix well, until very smooth.
  4. Divide batter between 12 greased muffin cups and let rest for 15 minutes.
  5. While the dough rests, mix together butter, brown sugar, cinnamon and cardamom in small bowl using a fork until all of the butter has been incorporated into the sugar and mixture is crumbly.
  6. Sprinkle filling evenly on top of rested dough and press the mixture down into the dough with your fingertips (or swirl in with a spatula).
  7. Place pan into a cold oven, then set oven temperature to 350F.
  8. Bake for about 20 minutes, until bread is lightly browned at the edges and the center of the bread springs back when lightly pressed.  Some of the sugar mixture on top may still be bubbling.
  9. Cool for at least 30 minutes before whisking the powdered sugar and milk together to form an icing and drizzling it onto the bread.
  10. Serve warm!!  Reheat in microwave as necessary.

Friday, June 4, 2010

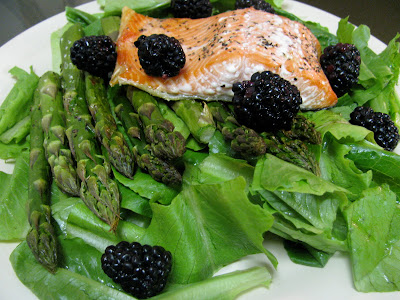
Asparagus and Salmon Salad w/ Blackberry Glaze

I was craving something summery.  I also wanted to use purchases from my recent Farmer's Market trip.  Enter this yummy recipe.


Overall, I was pretty satisfied with this meal.  It's amazing how a small amount of an ingredient can add so much flavor.  The sesame oil took over the other ingredients and turned this into an asian cuisine.  But, I was fine with that.  Just ate some more blackberries to add that summer flare I was looking for.
Asparagus and Salmon Salad w/ Blackberry Glaze
adapted from Clean Eating
Yield:  4 servings
Ingredients
  • 12 oz. wild-caught salmon fillet, skin and bones removed
  • cooking spray
  • 2 cups asparagus tips
  • 2 cups blackberries, divided
  • 2 tsp honey
  • 4 tsp low-sodium soy sauce
  • 2 tsp dark sesame oil
  • 1/4 cup fresh orange juice
  • 6 cups arugula (or whatever greens you want)
Instructions
  1. Preheat oven to 400 degrees F.  Divide salmon into 8 equal sized portions.  Mist a baking sheet with cooking spray and place salmon on baking sheet.  Bake for about 18 minutes or until fish is cooked through and begins to flake.  Remove from oven and let cool.
  2. Steam asparagus until crisp-tender.  Rinse with cool water and place in refrigerator.
  3. Take 16 blackberries and place them in a small bowl.  Mash, then add honey, soy sauce, oil and orange juice.  Stir to combine (berries will remain chunky).
  4. Arrange lettuce on plates and top with asparagus and 2 pieces of salmon.  Sprinkle reserved blackberries over salmon and drizzle blackberry-soy dressing evenly over plates.

Thursday, June 3, 2010

Lemon Hummus

WOAH!!!!  That's about all I can say.  


For some reason, I've held off on buying a food processor for the past several months.  I guess the main reason was my lack of kitchen storage space.  But, I grew sick and tired of seeing countless recipes for home-made pesto, hummus, nut butters, etc. and getting bummed out that I could not make them.  Finally, after a recipe for a maple-almond nut butter (it's coming!!) entered into my dreams, I decided it was time to purchase one.  Thank goodness I did.


This hummus.  This hummus has no words to describe it.  You just need to make it.  And eat it.  And never buy store bought hummus again.  
Lemon Hummus
adapted from Edible Moments


Ingredients
  • 1/4 cup tahini (sesame paste)
  • 3 tbsp fresh lemon juice
  • 3 tbsp olive oil
  • 2 cloves of garlic (minced)
  • 1/2 tsp ground cumin
  • 1/2 tsp salt
  • 1/4 tsp hot sauce
  • 1 1/2 cups of canned chick peas, drained and rinsed
Directions:
  1. Combine all ingredients in a food processor and puree. Place in bowl, sprinkle with paprika, and serve with pita wedges and chopped veggies.

Tuesday, June 1, 2010

Sugar Cookie Bars

I had been wanting to make this recipe for a long time.  Then again, what recipe haven't I been wanting to make for a long time?  I figured a Memorial Day weekend BBQ would be a perfect time for these puppies to make an appearance.  


It began a lovely Sunday morning.  Sipping on a cup of coffee.  Ron was in the living room watching ESPN and reading the newspaper.  Baking was going to be a wonderful, relaxing experience.  Then, all hell broke loose and I was in baking hell.  Baking hell in the form of:  Step X says "mix until just combined" and the dough is hard as hell to mix and there are little flour particles everywhere and cats are trying to jump on the counter and cats are trying to eat the dough that is flying all over the place and spoons are breaking because the mixture is so tough and . . . Ron is sitting there watching ESPN.  Awesome.


Well, this recipe is easy enough.  It is your standard sugar cookie recipe but instead of rolling out the dough, you bake it in bar form.  But, I made a few mistakes so I created my own baking hell.  Mistakes like, using a plastic spoon to mix the dough and my tiny little beater from college.  Nevermind the fact that I have a giant wooden spoon that tackles anything.  Or, a KitchenAid stand-mixer that is the most useful, powerful tool that I have in my kitchen.  I guess I felt the need to use my arm muscles, or something?!  Not to mention the fact that this recipe calls for a ginormous amount of ingredients.  8 cups of flour, sugar and butter combined?  With 4 eggs?  Whose bowl could fit this?  You can only imagine how much dough flew around my kitchen.


In any event, I was somehow able to get the dough mixed and spread into the pan.  I'm not so sure about this recipe.  Anything that has 2 cups of sugar, 1 cup of butter and 5 cups of flour in the base recipe just doesn't seem to sit right with me.  (Then, to top it off, we add about 4 cups of confectioners sugar!!)  Nonetheless, they were pretty dang good.  So, I guess all of those ingredients amounts to something. 
Sugar Cookie Bars
adapted from My Baking Addiction
Yield:  32 bars
Ingredients
  • 1 cup unsalted butter, at room temperature
  • 2 cups granulated sugar
  • 4 large eggs
  • 2 tsp vanilla
  • 5 cups AP flour
  • 1 tsp salt
  • 1/2 tsp baking soda
  • 1/2 cup butter, at room temperature
  • 1/2 cup shortening
  • 1 tsp vanilla
  • pinch of salt
  • 4 cups powdered sugar (sift after measuring)
  • 5 tbsp milk
  • food coloring, if desired
Instructions

  1. Cookies:  In a large bowl with an electric mixer, cream butter and sugar until fluffy.
  2. Add eggs, one at a time, mixing after each egg.
  3. Mix in vanilla.
  4. In a separate bowl, whisk together flour, salt and baking soda.
  5. Add to wet mixture and mix just until combined.
  6. Spread on a greased, rimmed baking sheet (13x18, if possible).  (Note:  the dough will be heavy and sticky, just like cookie dough.  Spray your hands with some nonstick spray and use them to help mold the dough into the pan.)
  7. Bake at 375 degrees for 10-15 minutes, until light golden brown or until a toothpick comes out clean.  Cool completely before frosting.
  8. Frosting:  In a large bowl, beat butter and shortening together until smooth and creamy.  
  9. Mix in vanilla and salt.
  10. Add powdered sugar (1 cup at a time) until combined.
  11. Mix in milk until smooth and spreading consistency.
  12. Add a few drops of color, if desired.
  13. Spread over cooled cookie, then cut into bars.  (I actually cut mine first then piped frosting onto them.  But, you can frost, then put them in the fridge to firm, then cut.)