Search My Blog!!

Sunday, November 28, 2010

Toasted Almond Scones

Yes!  Another scone recipe!  Once I get on a scone kick, I can't seem to stop.

This ones were baked recently for a friend's birthday.  I always like baking stuff that people enjoy for their birthdays, so I was very happy when she told me that she liked anything almond flavored.  At first, I was torn between cookies or a cake.  But, cookies are getting too much attention from my kitchen lately, so I quickly vetoed them.  I then purchased all of the ingredients for a beautiful almond cake, but quickly changed up my mind when I was flipping through my favorite cookbook and saw another delightful recipe.

So far, my birthday treats this year have fallen on Wednesdays.  I get to school so early on Wednesdays that I have brought in breakfast items because it felt more appropriate.  I guess the thought of digging into a icing laden cake at 8:30 a.m. doesn't sit well with me.  Dorie's toasted almond scone recipe has been on my to-bake list for quite some time, so I knew I had to make these as a treat.  I felt that the finished product needed some jazz so I whipped up a quick almond icing to drizzle on top.  Huzzah! Toasted almondy glazed goodness.
Toasted Almond Scones
Yield:  12 scones
Ingredients
  • 1 cup blanched almonds (whole, slivered or sliced), toasted
  • 2 Tbsp sugar
  • 1 large egg
  • 1/3 cup cold heavy cream
  • 1/4 cup cold milk
  • 1/8 tsp pure almond extract
  • 1 3/4 cup AP flour
  • 1 Tbsp baking powder
  • 1/4 tsp salt
  • 1 stick (8 Tbsp) cold unsalted butter, cut into small pieces
  • 1/4 cup sliced almonds (optional)
  • Glaze:  1 cup powdered sugar
  • 1 tsp pure almond extract
  • 2 Tbsp milk
Instructions
  1. For Scones:  Preheat the oven to 400 degrees F.  Line a baking sheet with parchment or a silicone mat.
  2. Divide the toasted almonds in half.  Finely grind 1/2 cup in food processor or blender with sugar, taking care not to overgrind the nuts and end up with an almond butter!  Finely chop the other 1/2 cup of toasted almonds.
  3. Stir the egg, cream, milk and almond extract together in a small bowl.
  4. Whisk the flour, ground almonds and sugar mixture, baking powder and salt together in a large bowl.  Drop in the butter and, using your fingers, toss to coat the pieces of butter with flour.  Quickly, with a pastry blender (or your fingers), cut and rub the butter into the dry ingredients until the mixture is pebbly.  (You'll have pea-size pieces, pieces the size of oatmeal flakes and pieces the size of everything in between - this is just right.)
  5. Pour the liquid ingredients over the dry ingredients and stir with a fork just until the dough, which will be wet and sticky, comes together.  Don't overdo it.  Stir in the chopped almonds.
  6. Still in the bowl, gently knead the dough by hand, or turn with a rubber spatula 8 to 10 times.  Turn the dough onto a lightly floured surface and divide in half.  Working with one piece at a time, pat the dough into a rough circle about 5 inches in diameter, cut into 6 wedges and top each scone with a few sliced almonds, if desired.
  7. Place scones on a baking sheet.  Bake for 20-22 minutes, or until the tops are golden and firmish.  Transfer to a rack and cool completely before drizzling with almond glaze.
  8. For Almond Glaze:  Combine powdered sugar, almond extract, and milk in a small bowl; whisk until smooth.  If too thick, add more milk.  If too thin, add more powdered sugar.  Drizzle icing over cooled scones.  Sprinkle more sliced almonds over glaze, if desired.

Saturday, November 27, 2010

Biscoff Cookies - Week Eight

Ron and I recently traveled via the friendly skies on a short vacation down to Florida.  I'm excited to report that I will be posting a full, detailed (and rather long) overview of our trip at some point in the next few days.  But, for now, I'm posting week eight's cookie recipe!  It is coming late because we were traveling, but better late than never.

This cookie was actually inspired by our recent air travels.  I cannot tell you how excited I get when the Delta flight attendant approaches my seat and says "cookies or pretzels?"  So, I was very unhappy when I looked at our ticket and realized I had booked AirTran for our flights.  What was I thinking?  Nevermind the fact that our plane was taking off from the crappy Humphrey terminal with terrible dining options and no shopping whatsoever (though, one positive was that we didn't have experiences with full body scanners over there), but we also wouldn't be getting any Biscoff cookies on the flight!  Frick.  Major fail.  I love Biscoff cookies.  They are a cinnamony, sugary, biscuity cookie and taste absolutely delicious with coffee. (Biscoff cookies are actually Belgium's favorite cookie known as speculoos cookies.  It is a crisp, spice cookie similar to a gingerbread, but more dense.)  The cookie is full of delicious spices and is delightful for a holiday spread.

On our return flight, the (rather rude) flight attendants walked down the aisle about 2 hours into the flight with a surprise treat:  BISCOFF COOKIES!  They were smaller than the ones we get on Delta, but delicious still the same.  I was so excited and knew that it called for a celebration so I searched for a copycat recipe.  Once found, I baked this batch up to celebrate week eight.  I left these in the oven for about 15-16 minutes to get them firm.  Once they cooled, they hardened up to that same buttery, crumby crunch that I love from Biscoff cookies.  Copycat recipe win!
Biscoff Cookies
from Cupcake Project
Ingredients
  • 2 C AP flour
  • 2 tsp ground cinnamon
  • 1/4 tsp ground nutmeg
  • 1/4 tsp ground ginger
  • 1/4 tsp ground allspice
  • 1/4 tsp ground cloves
  • 1/2 tsp salt
  • 1/4 tsp baking soda
  • 1/4 tsp baking powder
  • 1 C unsalted butter, room temperature
  • 1/2 C sugar
  • 1/4 C firmly packed brown sugar
  • 1 tsp vanilla
Instructions
  1. Preheat oven to 350 degrees F.
  2. In a medium sized bowl, mix together flour, spices (cinnamon, nutmeg, ginger, allspice, and cloves), baking soda, baking powder, and salt.
  3. In a separate large bowl, cream together butter, sugar, and brown sugar with an electric mixer on low speed.  Mix in vanilla extract.
  4. Gradually blend the flour mixture into the butter mixture until well combined.
  5. Roll out dough to 1/4 inch thickness.  Use cookie cutters to make desired cookie shapes.  Chill dough first if you find that it is difficult to roll.
  6. Place dough shapes onto parchment paper and bake for 13-16 minutes.  Cool on rack before serving.  Best served once they have cooled.

Tuesday, November 23, 2010

Maple-Hazelnut Sweet Potatoes and Butternut Squash Biscuits

I thought about posting these separately, but decided that they deserve to be together because they were so awesome together!  Don't tell Ron, but I really didn't eat much of the steak from the other night.  Don't get me wrong; it was absolutely delicious.  However, I filled up on my fair share of these biscuits and sweet potatoes.  I love mashing my food together and in lieu of butter, I spread sweet potatoes on my biscuit and it totally rocked.
These are two really quick and easy sides that would work very well with a holiday meal or whenever you want something to take a notch up from your traditional mashed potatoes.  The preparation is so simple for both.  For the potatoes, I chose the quick and easy route because it utilizes the microwave.  During the holidays, so many kitchen appliances are in use and so many sides are occupying your stovetop.  These sweet potatoes don't require oven baking or stovetop boiling.  They can easily be prepared within 20 minutes of setting your table.  Plus, they are so delicious!  I love butternut squash so I wanted to try and incorporate some into the meal.  I cut a Dorie recipe for sweet potato biscuits in half and substituted the squash in equal parts.  Yum!  I opted out of rolling out my biscuits, so they don't exactly look like the beautiful buttery discs that normally grace one's table.  Instead, I grabbed my large cookie scoop and started splatting biscuit dough on a parchment lined baking sheet.  Hey, whatever works, right?
Maple-Hazelnut Sweet Potatoes
Cooking Light
Yield:  4 servings
Ingredients
  • 2 x (8 ounce) sweet potatoes
  • 1/4 cup low-fat milk
  • 2 Tbsp butter
  • 1 Tbsp pure maple syrup
  • 1/4 tsp salt
  • 2 Tbsp chopped blanched hazelnuts
Instructions
  1. Pierce sweet potatoes with a fork; place on a layer of paper towels in the microwave.  Microwave on high for 10 minutes or until tender; let stand for 5 minutes.
  2. Peel potatoes and discard skins.
  3. Place potatoes in a bowl; mash with a potato masher to desired consistency.
  4. Add milk, butter, maple syrup, and salt; stir until well-combined.
  5. Top with chopped hazelnuts.
Butternut Squash Biscuits
Yield:  9 biscuits
Ingredients
  • 1 cup AP flour
  • 3/4 cup WW flour
  • 2 1/2 tsp baking powder
  • 1/2 tsp salt
  • 1/4 tsp baking soda
  • 8 Tbsp (1 stick) butter, cold and cut in pieces
  • 3/4 cup butternut squash puree (fresh or from a can)
    • When puree'ing my squash after baking it in the oven, I added some pure maple syrup to my food processor.
  • 1/3 cup buttermilk
  • 1 Tbsp heavy cream (optional)
Instructions
  1. Preheat oven to 425 degrees.
  2. In a bowl, combine the flours, baking powder, salt, and baking soda.
  3. With a pastry blender, cut in butter until mixture resembles coarse crumbs.
  4. In separate bowl, whisk together the butternut squash and buttermilk.
  5. Pour liquid ingredients into dry buttery mixture and mix just until moistened.  
  6. Knead 8-10 times.
  7. Roll dough to a 1-inch thickness and cut with a biscuit cutter.
  8. Place biscuits 1 inch apart on a greased baking sheet or a sheet lined with parchment paper.
  9. If desired, brush biscuits with heavy cream.
  10. Bake at 425 degrees F until biscuits are golden brown.
  11. Serve warm with butter (or sweet potatoes).

    Monday, November 22, 2010

    Roasted Cumin Crusted New York Strip with Buttery Lemon Broccolini

    I'm sure that Ron was thrilled when I hung the weekly menu on the fridge.  Nevermind the freezing snow/sleet/rain that was in the forecast, a steak was listed on paper, ready for preparation, and requiring an outdoor grill.  I did ask ahead of time if he wanted to grill in the 20 degree weather, because I was more than willing to broil the steaks or use the grill pan. but Ron wanted to rough it I guess.  Plus, I request red meat so infrequently that I don't think he'd care if I requested it in the middle of January.

    I had been preparing the menu for the week of Thanksgiving and knew that I wanted to try some harvest flavors and side dishes.  McCormick recently launched a new line of seasonings and advertisements were popping up in all of my food magazines.  This one caught my eye and I wanted to try it out.  This steak rub was amazing.  It was the first time that I ever had a steak in which I did not enlist the help of steak sauce.  The rub cakes on the steak and forms a crust (hence the title) that is spicy and sweet.  With the lemony broccolini, it was a mixture of the best flavors.  All of the sides that I prepared were pretty quick and easy to whip up.  So, the meal that looked like it took a decent amount of time to prepare actually only took about 1 hour or so.  I served this with some maple-hazelnut sweet potatoes and butternut squash biscuits.  The entire meal was delightful.  The recipes for the sweet potatoes and butternut squash biscuits will be posted later this week.
    Roasted Cumin Crusted New York Strip
    McCormick
    Yield:  4 servings
    Ingredients
    • 1 Tbsp brown sugar
    • 1 Tbsp McCormick Roasted Ground Cumin
    • 1 tsp oregano leaves
    • 1 tsp sea salt
    • 1/2 tsp garlic powder
    • 1/4 tsp ground cayenne red pepper
    • 1 lb. boneless beef sirloin or New York Strip steaks (about 3/4 inch thick)
    Instructions
    1. Mix first 6 ingredients.  Brush steaks lightly with oil.  Rub spice mixture on both sides of steak.  Refrigerate at least 30 minutes.
    2. Grill steaks over medium-high heat 6-8 minutes per side or until desired doneness. 
    Buttery Lemon Broccolini
    Cooking Light
    Yield:  8 servings
    Ingredients
    • 4 quarts water
    • 2 1/2 tsp salt, divided
    • 4 (6-ounce) packages Broccolini
    • 2 Tbsp butter, softened
    • 1 tsp grated lemon rind
    • 1 Tbsp fresh lemon juice
    • 1/4 tsp black pepper
    Instructions
    1. Bring water to a boil in a large sauce pan; add 2 tsp salt.  Cook broccolini in batches for 5 minutes; remove with a slotted spoon.  Drain.
    2. Combine butter, rind, and juice, stirring with a fork until well blended.  Return broccolini to pan over medium-high heat; stir in butter mixture, remaining 1/2 tsp salt, and pepper, tossing gently to coat.

    Saturday, November 20, 2010

    Espresso Cappuccino Scones

    I've been on a scone baking kick lately.  I love making them.  They are just so fun!  I created this recipe one day when I wanted something more "coffee-ish" to go with my coffee.  Isn't that horrible?  I needed coffee, with a side of coffee.

    This recipe was dynamite but I hesitated to post it.  First, I wasn't sure if I should have dissolved the espresso powder instead of just adding the espresso powder in so I contemplated baking them again.  I think that had I just added the espresso powder, we would've had a bit more "oomph" to the taste.  But, I decided to post because they were pretty tasty as the recipe stands.  But, the main reason for my hesitation was that I've had a hard time finding the Guittard cappuccino chips in stores since my mom sent me some packages a while back.  A quick google search informed me Guittard stopped making them indefinitely (gasp!) but I did locate them on King Arthur flour.  Mini chocolate chips would work perfectly fine here, but I encourage the cappuccino chips as they really are a unique flavor that are  distinctive in this scone.  Plus, you can make tons of other mocha'y goodness with them!
    Espresso Cappuccino Scones
    adapted from a number of sources
    Yield:  16 scones
    Ingredients
    • 3 cups AP flour
    • 1/3 cup sugar
    • 1 tsp salt
    • 2 1/2 tsp baking powder
    • 1/2 tsp baking soda
    • 1 1/2 stick butter, cut into pieces and chilled
    • ~3/4 cup buttermilk
    • 3 oz. strong coffee or espresso
    • 1/2 cup - 2/3 cup cappuccino chips (or mini chocolate chips)
    • 1 Tbsp heavy cream
    Instructions
    1. Preheat oven to 400 degrees F.
    2. Combine flour, sugar, salt, baking powder and baking soda in a bowl.
    3. Mix butter in with the dry ingredients until the mixture is dry, coarse and crumbly.
    4. Mix espresso in a measuring cup.  Add enough buttermilk to equal 1 cup total, then stir into the flour/butter mixture.
    5. Add the cappuccino chips and mix until evenly distributed.
    6. Divide dough into 2 sections.  Roll one section into a round with 3/4" thickness.  Cut into 8 even scones.  Repeat with remaining dough.
    7. Brush scones with heavy cream.
    8. Bake at 400 degrees F for 15 minutes or until lightly browned.

    Friday, November 19, 2010

    Butter Pecan Sandies - Week Seven

    Ron isn't always a man of many words.  He can talk about sports for hours.  And, he can talk about his technology job for hours.  And, he can talk about his favorite movies or shows for hours.  But, when it comes to daily chit-chat, he pretty much just doesn't do it.  Sometimes our conversations remind me of an episode of The Wonder Years where Kevin's mom is asking his father about his day.  "How was work?"  "Work was work."  "How was traffic?"  "Traffic was traffic."  You get the gist.

    I've inherited this annoying trait from my mom that I like to refer to as the question game.  The question game consists of one person, namely me, asking as many questions that can possibly be on my mind to the listening party.  I've developed a bad habit.  Any time that Ron is in a talkative mood, I subconsciously start thinking about all of the questions that I've had building up to ask him.  They are always something mundane like "what do you want for dinner?"  or "do you want to do this tonight?"  But, somehow it turns into an overload of questions and I can't help myself.

    For week seven, I wasn't sure what cookie to make.  Having annoyed Ron with cookie questions for the prior six weeks, I didn't ask him what kind he wanted.  Imagine my excitement as we walked through the aisle at Lunds and Ron asked, "What kind of cookie were you planning this week?"  I had to tread around these waters carefully.  If I sounded like I was too overzealous about such an inquiry, Ron might back off and resort to cranky grocery shopping Ron.  I replied calmly, as if I hadn't been pouring over recipes for the past five days, "Umm, I'm not sure.  Do you have something you want?"  He looked at all of the nuts that were right in front of us and said, "How about some type of nutty cookie?"  SCORE!  A nutty cookie!  A request from Ron himself.  My brain started flooding with thoughts but we still had several aisles to go and I didn't want to ruin the trip; cranky grocery shopping Ron always ends disastrous.

    But the next morning, all hell broke loose.  The "nutty" cookie recipes on the internet and in my saved "to make" que were inundating.  I couldn't handle it!  What kind of "nutty" cookie did Ron want?  What exactly did he have in mind when he requested a nutty cookie?  Did he want something soft?  Did he want some type of shortbread?  Did he want a specific nut in the cookie?  Did he want multiple types of nuts in the cookie?  Did he want some type of nutty thumbprint cookie with some type of frosting in the center? If so, what kind of frosting did he want in the center?  Did he want a nutty drop cookie or a nutty roll out cookie?  Was he craving chocolate or vanilla?  Did he want baking chips mixed into his cookie with the nuts?

    Needless to say, Ron woke up and... well... too many questions were involved for a Sunday morning.  Ron will not be requesting a specific cookie again for 12 Weeks of Holiday Cookies.  But, the good news is that these butter pecan sandies turned out beautifully and they were a delicious choice for week seven.  They were reminiscent of a shortbread cookie and absolutely delectable.
    Butter Pecan Cookies
    Martha Stewart
    Yield:  12 cookies
    Ingredients
    • 3/4 cup pecans
    • 1/2 cup (1 stick) unsalted butter, room temperature
    • 1/3 cup sugar, plus more for coating
    • 1 tsp vanilla
    • 1/8 tsp salt
    • 1 cup AP flour
    Instructions
    1. Preheat oven to 350 degrees F.  On a baking sheet, toast pecan until fragrant, about 6 minutes, stirring once.  Let cool completely; finely chop.
    2. With an electric mixer, cream butter and 1/3 cup sugar until light, about 1 minute.  Beat in vanilla, salt, and flour, scraping down sides of bowl, just until dough comes together.  Fold in pecans.
    3. Separate dough into 12 pieces; squeeze dough to shape into balls.  Roll in sugar.  Place 3" apart on a baking sheet.  Gently flatten with the bottom of a glass. Sprinkle with sugar.
    4. Bake until golden brown, rotating sheet halfway through, about 15 minutes.  Sprinkle with sugar.  Cool cookies on a wire rack.

    Thursday, November 18, 2010

    Jalepeno Cheddar Bread

    Instead of the typical cornbread that I normally serve with chili, I decided to change it up and bake a bread that I have had saved in my que for a while now.  I've never made any type of bread that has cheese in it so I was excited to try this and for Ron to test it out.  We absolutely loved it!  It has officially replaced all chili-accompanying bread from here on out.

    This bread takes minutes to put together.  Most of the work involved is cutting up the peppers.  I didn't use roasted red peppers for my bread like the original recipe requested.  I knew I'd have enough trouble getting Ron to eat a bread that had green specks in it, so the red would certainly be a challenge.  I did use the green pepper but he couldn't tell the difference.  This bread is delicious.  Ron cut up chunks to eat with his chili.  I've never seen him so excited to eat leftovers, but I'm happy to know that the entire meal was a success.
    Jalepeno Cheddar Bread
    Homemade by Holman
    Ingredients
    • 2 cups AP flour
    • 2 tsp sugar
    • 1 Tbsp baking powder
    • 1 tsp freshly ground black pepper
    • 1 tsp salt
    • 1 cup shredded sharp cheddar cheese
    • 1 cup milk
    • 1/3 cup canola oil
    • 1 large egg
    • 3 jalepeno peppers, seeded and diced
    • 1/2 cup green bell pepper, diced
    • 1/2 cup roasted red pepper, diced
    Instructions
    1. Preheat oven to 375 degrees F.  Spray an 8" x 4" loaf pan with baking spray.
    2. In a large bowl, combine flour, sugar, baking powder, salt, pepper, and cheese.  Toss together and make a well in the center.
    3. In a separate bowl, combine milk, oil, and egg and whisk together.  Pour mixture into well in center of flour and stir mix together lightly with a wooden spoon.
    4. Add peppers and stir just until dry ingredients are all combined.  The batter will be lumpy.
    5. Pour batter into prepared loaf pan.
    6. Bake bread for 45-50 minutes or until golden brown.  Cool in pan for about 10 minutes, then turn out of pan and cool completely on a wire rack.

    Wednesday, November 17, 2010

    Beef and Bean Crockpot Chili

    Chili is one of those comfort foods that you instantly start to crave once the weather gets cold and the white stuff starts to fall.  This past weekend, the cities got hit with the first snowstorm of the year and without much thought chili was listed as a dish to come on our weekly menu.  Chili is such an easy and versatile dish to make.  It's relatively low fail and the ingredients are flexible.
    I found an interesting recipe for a beef and bean chili that was heated in the crockpot for 8-10 hours.  I'm a fan of all things crockpot so I decided to give it a go.  Honestly, I'd say it was one of the best chili's I have ever had.  I still enjoy my mom's chili recipe, but this one had so many unique and interesting flavors that I might have to be making this one more often.  The flavors all mixed together and resulted in an amazing bowl of chili.  Of course, it didn't hurt that I baked up a loaf of delicious jalepeno cheddar bread to eat with the chili.  That post is forthcoming.  :)  My only word of caution is that this chili recipe makes a ton.  We'll be having this for a few days, but we're certainly not complaining.
    Beef and Bean Crockpot Chili
    Greens and Chocolate
    Ingredients
    • 1 onion, chopped
    • 1 green bell pepper, chopped
    • 2 cloves garlic, minced
    • 1 lb lean grass-fed ground beef
    • 1 (14 oz) can diced tomatoes, undrained
    • 1 (6 oz) can tomato paste
    • 1 (14 ounce) can tomato sauce
    • 1 cup water or 1 cup dark beer
    • 1/2 cup strong coffee
    • 2 Tbsp brown sugar
    • 2 Tbsp good chili powder
    • 1 tsp cayenne pepper (more or less)
    • 1/2 Tbsp cumin
    • 1 Tbsp unsweetened cocoa powder
    • 1 tsp oregano
    • 1 tsp salt
    • 1 (15 ounce) can kidney beans (undrained)
    • 2 (15 ounce) cans pinto beans (undrained)
    Instructions
    1. In large skillet, brown the meat over medium-high heat.  Drain and place in crockpot when done.
    2. In same skillet, cook onions and peppers until onions are translucent.  Add garlic and cook 1 more minute.  When done, add to crockpot.
    3. Next, add rest of ingredients to crockpot and stir well to combine.  Cover and cook on low 8-10 hours.  Top with sour cream, cheese, tortilla chips, or crackers.  And, serve with cornbread.  :)

    Monday, November 15, 2010

    Sesame Chicken Couscous

    So, if anyone checked my blog earlier, you would've seen a very long rant from me.  I decided to erase the post because it's not worth complaining about something I cannot control!  If you are interested in what the complaining was about -- I fractured my foot this past weekend.  Major lameness.

    Now, moving on to more positive things.  :)  This couscous salad.  Here is another very quick and easy couscous salad to mix up for lunch or dinner.  With the grains, the protein, and the vegetables, it provides a very satisfying and filling bite.  I love the asian flavors mixed in with the couscous as it was definitely different from my normal couscous salads.  I'm guessing that this could easily be made with whatever grain you'd like.  To save time, you can always buy pre-cut vegetables and a rotisserie chicken at the store.
    Sesame Chicken Couscous
    from The Foodie Spot
    Yield:  4 servings
    Ingredients
    • 1 1/2 cups chicken broth
    • 3 tsp soy sauce, divided
    • 2 tsp sesame oil, divided
    • 1 cup uncooked whole wheat couscous
    • 2 green onions, sliced
    • 1 large red sweet pepper, chopped
    • 1 1/2 cups sugar snap peas or snow peas
    • 3/4 cup broccoli florets
    • 1 cup cooked, chopped chicken
    • 1/4 cup lemon juice (juice of 1 small lemon)
    • 2 Tbsp olive oil
    • 1/4 tsp pepper
    • 1/4 cup slivered almonds
    • 1 Tbsp sesame seeds
    Instructions
    1. Bring chicken broth, 1 tsp soy sauce, and 1 tsp sesame oil in a medium saucepan and bring to a boil.  Stir in uncooked couscous, cover, and let stand until liquid has absorbed.  Fluff with work and transfer to a larger bowl.  Stir in green onions and red peppers.  Set aside.
    2. Meanwhile, steam peas 1 minute.  Add broccoli and steam until crisp tender.  Rinse in cold water and drain.
    3. Add steamed vegetables and cooked chicken to couscous mixture.  Set aside.
    4. For the dressing, mix together lemon juice, olive oil, 2 tsp soy sauce, pepper, and 1 tsp sesame oil. Mix into couscous salad.  Before serving, stir in slivered almonds and top with sesame seeds.

    Friday, November 12, 2010

    Dark Chocolate Peanut Butter Sandwich Cookies - Week Six

    These actually started out as Red Velvet sandwich cookies (aka whoopie pies).  I haven't been in a baking mood this week (sigh; I know!) and I wanted to whip up something quick and easy to fill this week's cookie.  So, I spotted a recipe for Red Velvet sandwich cookies and thought it would be quick and painless.  Then, I realized that I don't exactly like using food coloring products and I didn't have any natural color.  So, I decided that I would omit the food coloring step* and just use the cocoa powder to keep them a true chocolate color.

    Beautiful adaption.  Though, I wouldn't exactly call it an adaption as I simply left out one ingredient.  Anyway.  I planned to keep the white frosting but as I began to bake the cookies I knew that peanut butter would put these over the top.  I mixed up a quick peanut butter frosting using natural, crunchy peanut butter.  It totally worked!

    We've been eating quite a lot of cookies in this household so I opted to cut the recipe in half and make larger whoopie pies.  I ended up only getting 4.  Ooops!  They are pretty decadent though so we don't need too many of these lying around.  You could make them smaller to get bite sized cookies.  Actually, that would be awesome.  Ron coined these the best cookies I've ever made.  He said they were baked absolutely perfectly and he also told me I should start selling them on the street!  Hmm.... Challenge Accepted!

    *If you'd like to make red velvet cookies, simply incorporate 1 x Tbsp red food coloring with step #4 below.  Then mix up your favorite cream cheese frosting or buttercream frosting to pair with the cookie cakes!
    Dark Chocolate Peanut Butter Whoopie Pies
    adapted from The Family Kitchen
    Yield:  10-15
    Ingredients
    Cookies
    • 1/4 cup butter, softened
    • 1 cup sugar
    • 2 eggs
    • 2 Tbsp buttermilk
    • 1 tsp vanilla
    • 1 1/3 cups AP flour
    • 4 Tbsp Hershey Special Dark cocoa powder (or use regular)
    • 1 tsp baking powder
    • 1/4 tsp baking soda
    • 1/2 tsp salt
    Frosting
    • 1/4 cup softened butter
    • 1/2 cup peanut butter
    • 1 cup confectioners' sugar
    • 1 Tbsp + 1 1/2 tsp milk, or as needed
    Instructions
    1. For cookies:  Preheat the oven to 375 degrees F.
    2. In a large mixing bowl, cream together butter and sugar.
    3. Add in eggs one at a time, beating after each addition.
    4. Beat in buttermilk and vanilla.
    5. Whisk together flour, cocoa powder, baking powder, baking soda and salt in a separate bowl (or in your wet ingredients if you are feeling like taking a risk!).
    6. Stir the dry ingredients into the wet ingredients.
    7. Scoop the dough onto a lined cookie sheet using a generous medium scoop (2-3 Tbsp) and place about 2 inches apart.
    8. Bake at 375 degrees F for 10-12 minutes until center appears set.  Allow to cool slightly, then pull the liner onto the wire cooling rack to cool completely.
    9. For frosting:  Cream the butter and peanut butter together in a mixing bowl.  Gradually mix in sugar and when it starts to get thick, slowly add milk until all of the sugar is mixed in and the frosting is spreadable.  Beat at least 3 minutes to get the frosting fluffy.  
    10. Once cookies have cooled, spread the frosting onto one cookie and place another cookie on top to create a sandwich.  Enjoy!

    Wednesday, November 10, 2010

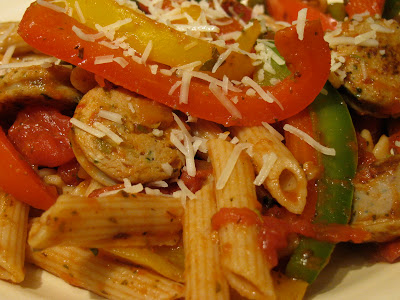
    Sausage and Pepper Penne

    As mentioned previously, I've been making a few recipes from a cookbook my mom got me some time ago titled The Pampered Chef: It's good for You.  With the exception of a soup that turned out to taste quite disgusting (a greek soup with lemon), the recipes have worked out quite nicely.  They are all fairly easy to make and like the title suggests, they are good for you!  This recipe took about 30 minutes to make and it worked pretty nicely.  I wouldn't exactly call this a recipe to prepare if you are trying to impress guests, but it certainly works for a quick weeknight meal.  The spicy sausage added a kick to the pasta.  One thing worth noting is that it did not keep really well because the sauce was on the pasta (you can easily save that step and keep them separate).  By the next day, the pasta was a bit mushy but it was still edible.  :)  Serve this up with some bread and a side salad.  Dinner will be ready in 30 minutes or less!
    Sausage and Pepper Penne
    Pampered Chef:  It's Good for You
    Yield:  4-6 servings
    Ingredients
    • 8 ounces uncooked penne pasta
    • 1 pound hot italian turkey sausage (about 4 links) (You can also use a spicy chicken sausage that is precooked and simply reheat it in the skillet per the directions in Step 2.)
    • 1 each:  medium green, red and yellow bell pepper, cut into 1/4 inch strips
    • 1/2 cup coarsely chopped onion
    • 2 garlic cloves, pressed
    • 1 can (14.5 ounces) diced tomatoes in sauce, undrained
    • 1 can (8 ounces) tomato sauce
    • 2 tsp italian season
    • 1/4 cup (1 ounce) grated fresh Parmesan cheese
    Instructions
    1. Cook pasta according to package directions; drain and keep warm.
    2. Meanwhile, cook sausage in a skillet over medium-high heat 14-16 minutes or until sausage is lightly browned and no longer pink, turning occasionally.  Remove sausages from skillet; cut diagonally into 1-inch pieces and set aside.  
    3. In same skillet, cook bell peppers, onion and garlic over medium heat 6-8 minutes or until peppers are crisp-tender, stirring occasionally.  Add sausage, tomatoes, tomato sauce and seasoning mix.  Cook and stir 1-2 minutes or until heated through.
    4. Place pasta in large bowl; pour sauce mixture over pasta, tossing to coat.  Sprinkle with Parmesan cheese and serve immediately.

    Monday, November 8, 2010

    Cinnamon and Sugar Biscuit Pecan Rolls

    Has anyone ever noticed that Mickey Mouse appears in most of my photos lurking in the background?  He is my pepper shaker and he likes to oversee things.  (Minnie Mouse, otherwise known as salt shaker, is quite shy.)   I've also realized that my plates are quite boring.  I might need to invest in some prettier plates so I can have better looking food photos.

    Anyway.

    Ron's been working like a mad man.  His job is keeping him at work from 9 am - 9 pm on most nights and he is gone on weekends.  It's been making me sad because I don't really see him - and when I do see him - he's staring at his Blackberry and normally not "all there" because he's so focused on what's going on at work.  But, his job is demanding right now and it requires his full time.  He's an important dude and I'm envious of his knowledge at his place of employment.  But, it still makes me miss him and it makes me wonder how my parents made it through so many years of long hours and time away from one another.

    My dad didn't always have a relaxing job.  I don't think he's ever had a relaxing job.  (Where are these relaxing and fun jobs that a small group of people talk about?)  But, I especially remember when I was younger and his job was in Pittsburgh, while our family was in Allentown, PA (closer to Philadelphia).  He would often make the 4 hour drive on the turnpike just to be able to spend the weekends with us.  Eventually, we moved to Pittsburgh, but I cannot imagine how grueling that lifestyle was.  I also remember a time when I was younger and my dad was working two jobs.  He would work his day job from early AM to the standard PM hour.  Then, he'd come home and sleep for a few hours before he would head out to his late evening to early AM shift.  It's truly remarkable to think what parents do for their families.  I didn't appreciate those efforts at the time because I did not understand the full extent of why my dad had to work two jobs, or why he was gone so often.  But, I do now.  And I don't like letting many days go by without letting my parents know how much I appreciate them now, then, and always for everything they have ever done to provide such a wonderful life for my sister and I and to build an amazing family.

    Even though Ron doesn't work 4 hours away and even though Ron is still able to sleep next to me in bed at night, I do miss our time together.  I took for granted how valuable simple dinners can be at a decent hour or how valuable our Wednesday night TV time can be.  So, I wanted to bake him something that he would enjoy to thank him for his efforts and to tell him that I love and support him.  He is, after all, the one essentially supporting our family will I am pursuing my law education.  He has a huge burden to bear and he followed me to Minnesota to pursue my dreams.  I only hope I can do the same for him in the future.  He's a huge cinnamon bun fan, so I figured it would be time to finally tackle some type of sweet roll.  I mentioned a few days ago in my 'One Year In' post how all attempts to cook and bake have not been total successes.  Cinnamon buns, which I have tried to bake over 3 times now, have always been my nemesis.  We even had one disaster that involved me throwing dough around the kitchen and then spending 2 hours cleaning it up.  Oi!

    I'm glad to say that I finally found a recipe I am happy with.  Even though it was not really true cinnamon bun per se (no yeast), it still involved rolling the dough which always seems to develop into a situation.  I'm not going to say this experience was totally perfect, but I will say that they turned out quite yummy.  Ron was definitely impressed and devoured a pecan bun with a big smile on his face.
    Cinnamon and Sugar Biscuit Pecan Rolls
    The Baker's Daughter
    Yield:  10 rolls
    Ingredients
    • 1 cup butter
    • 3/4 cup brown sugar, divided
    • 6 Tbsp butter, melted, divided
    • 2 cups AP flour
    • 2 Tbsp sugar
    • 1 tsp baking powder
    • 1 tsp baking soda
    • pinch of salt
    • 1/2 cup cold butter, cut into cubes
    • 2/3 cup buttermilk
    • 1 tsp cinnamon
    Instructions
    1. Preheat oven to 350 degrees F.  Grease a 7-inch round cake pan and place 1 cup of pecans on the bottom.  Sprinkle 1/4 cup of brown sugar on top of pecans and drizzle 2 Tbsp of melted butter over pecans and brown sugar.
    2. In a medium bowl, whisk together the flour, baking powder, baking soda and salt.  Using your fingers or a pastry blender, cut in the cubed butter into the flour mixture until a coarse crumb forms.  
    3. Mix in the buttermilk with a spoon and your hands to form the dough in a ball.
    4. Lightly flour your table and rolling pin and roll out the dough into a 15 inch x 13 inch rectangle.  Spread 1/2 cup of brown sugar over the dough and sprinkle with the cinnamon.  Drizzle the 4 Tbsp of remaining melted butter evenly over the dough.  Roll the dough lengthwise placing the seam on the bottom.  Cut the dough into 10 x 1 1/2 inch pieces.
    5. Place the pieces in the pan and bake for 20-25 minutes until lightly browned on the top.
    6. As soon as the pan is out of the oven, flip it over onto a parchment lined tray or plate so the pecans are on top.  (If you don't do this immediately, the sugar will cool and it may stick.)

    Sunday, November 7, 2010

    Maple Glazed Salmon

    I love salmon.  It's such a versatile and healthy fish that takes virtually minutes to make.  For a while, I used to be the person who ordered salmon every single time we went to a restaurant.  All of my friends and family could practically predict what I would get, and sometimes ordered for me if I was running late, because I was so obvious about it.  I thought I had legitimate reasons for doing so.  Fish was smelly and my kitchen was small.  Smelly food + small kitchen = smelly house for a week!  Plus, I didn't know how to cook fish so I always opted for salmon so I could enjoy it without the negatives.  Then, I decided to bite the bullet and make my own salmon with this delicious recipe.  I was blown away by how easy it was.  To top it off, the fish didn't make a stench that permeated throughout the entire house and it was delicious restaurant-quality food!  Since then, I've been able to venture outside of my salmon box while dining out.  Thank goodness, because there are a lot of other wonderful options on a menu!

    I posted the recipe for the butternut squash couscous a while ago, but I forgot to post the maple glazed salmon that I had with it!  This recipe comes from Cooking Light and I love the maple syrup that is used to glaze the fish after it has been cooked.  It took about 20 minutes to prepare the spice rub and cook the salmon, so it can easily be served as a quick weeknight meal with a side of couscous or rice and veggies.  The Cooking Light link even provides a suggested wine pairing, so check it out if you plan to make this for dinner!  The magazine itself provides a quick and easy side to prepare - tomato-dill couscous - so if you feel so inclined, mix this up as well.
    Maple Glazed Salmon
    Cooking Light
    Ingredients
    • 1 tsp paprika
    • 1/2 tsp chili powder
    • 1/2 tsp ancho chile powder (or regular)
    • 1/4 tsp ground cumin
    • 1/4 tsp brown sugar
    • 1 tsp salt
    • 4 (6-ounce) salmon fillets
    • cooking spray
    • 2 Tbsp maple syrup
    Instructions
    1. Preheat broiler.
    2. Combine first 6 ingredients; rub spice mixture evenly over flesh side of fillets.
    3. Place fish on a broiler pan coated with cooking spray; broil 6 minutes or until desired degree of doneness.
    4. Brush fillets evenly with maple syrup; broil an additional 1 minute.

    Friday, November 5, 2010

    Take 5 Cookies - Week Five

    For week five, I made yet another "drop" cookie.  These babies were inspired by Halloween.  We passed out Take 5 miniature candy bars and miniature Rolos to the trick-or-treaters.  My head started spinning with excitement because I realized that the candy could easily make one amazing cookie.  

    I was absolutely thrilled with the result.  These cookies turned out pretty good.  I did leave them in the oven a tad too long (does anyone know how to work with a fluctuating oven?) so they were slightly harder than I wanted them to be, but they still tasted great.  In the future, I will likely add more peanut butter and less cocoa powder because the chocolate was definitely prominent, but the peanut butter not so much.  I actually worked with a base recipe that I've used dozens of time and then added the pretzels and peanuts on a whim.  I used honey roasted because I thought it might enhance the flavor more even though true Take 5 candy bars use roasted peanuts.

    I thought that I had created some groundbreaking cookie, but of course I turned to the internet and found out that people have been making similar cookies since the Take 5 candy bar first hit the shelves several years ago.  Oh well.  Most of their recipes used actual Take 5 bars in the batter.  And, mine was more innovative, so I'll take it! :)
    Take 5 Cookies
    adapted from Picky Palate
    Yield:  3 dozen cookies
    Ingredients
    • 1 cup butter, softened
    • 1 cup white sugar
    • 3/4 cup brown sugar
    • 2 eggs
    • 1 tsp. vanilla
    • 1/2 cup - 3/4 cup creamy peanut butter
    • 1 3/4 cup flour
    • 1 1/4 cups cocoa powder (I used Hershey's Special Dark)
    • 2 tsp. baking soda
    • 1/4 tsp salt.
    • 3/4 cup crushed pretzels
    • 1/2 - 3/4 cup crushed honey roasted peanuts
    • One package of rolo candies, unwrapped
    Instructions
    1. Preheat oven to 350 degrees and line cookie sheets with parchment paper.
    2. In a large bowl, cream together the butter and sugars until light and fluffy.  Slowly add eggs and vanilla until well combined.  Then add peanut butter until combined.
    3. In another bowl, combine the flour, cocoa, baking soda and salt.  Slowly add to wet ingredients (batter will be very thick) then stir/fold in the pretzels and peanuts.
    4. Using a medium (Tbsp.) cookie scoop, scoop out rounds of dough.  Slightly flatten the dough and place one unwrapped rolo candy in the center.  Fold up the sides and wrap around the rolo to form a ball, making sure that the rolo is completely covered.  Place onto prepared cookie sheet and repeat as follows.
    5. Bake for 9-12 minutes until the cookies are still slightly soft but will firm up while cooling on the sheet for 5 minutes.  Remove cookies to a wire rack to cool completely.

    Thursday, November 4, 2010

    Blackened Fish Tacos

    It's hard to get Ron to eat any type of fish.  He has tried bites of salmon before, and he eats crab and shrimp, but he'll never actually sit down and eat a piece of fish as his main entree.  However, he does enjoy a fish taco.  When we were in Mexico a few years ago, I think he practically lived off of fish tacos when we were there.  Granted, their fish tacos were heavily breaded and fried, but I figured I would give these blackened fish tacos a try.  Good news:  he ate them and I was also happy with the result.
    I used a recipe from a cookbook that my mom got me a few years ago from Pampered Chef.  I've actually been working my way through some of the recipes in it and they are quite good, so I'll keep them coming.
    Fish Tacos
    adapted from The Pampered Chef:  It's good for You and Annie's Eats
    Ingredients
    Marinade
    • 2 Tbsp lime juice
    • 3 Tbsp oil
    • 3 Tbsp minced cilantro
    • 1/4 tsp cumin
    • 2 cloves garlic, minced
    • 1 lb white fish (halibut, cod, tilapia, etc.)
    • salt
    Slaw
    • 1/4 cup sliced green onions
    • 2 Tbsp minced cilantro
    • 1 Tbsp lime juice
    • 1 Tbsp vegetable oil
    • 1 garlic clove, minced
    • 1 tsp sugar
    • 1/2 tsp cajun or blackened fish seasoning
    • 2 cups broccoli slaw mix
    Cilantro-Cream Sauce
    • juice of 1 lime
    • 2 Tbsp cilantro, minced
    • 6 oz. nonfat greek yogurt or sour cream
    • 1 clove garlic, minced
    • pepper, to taste
    For Serving
    • 6-inch flour tortillas
    Instructions
    1. For Fish:  Combine the marinade ingredients in a shallow dish and whisk until blended.  Place the fish in the mixture, turning to coat, and marinade for 15-30 minutes.
    2. For Slaw:  Combine green onions, cilantro, lime juice, oil, garlic, sugar, and seasoning in a bowl; whisk until blended.  Add slaw mix; toss to coat.  Cover; refrigerate until ready to serve.
    3. Prepare cilantro cream sauce:  Combine all ingredients in a small bowl and mix until well blended.  Refrigerate until ready to use.
    4. Cook Fish:  Heat 1 Tbsp oil in a large skillet over medium-high heat until shimmering.  Place the fish in the pan and cook without disturbing, 3 minutes.  Add more cajun seasoning, if desired.  Flip the fish and cook on the second side 2-3 minutes more.  Remove to a plate, season with salt as desired, and let rest for a few minutes.  Shred the fish into bite-sized pieces with two forks.
    5. Assemble tacos on flour tortillas with shredded fish, cilantro cream sauce, slaw, and additional toppings as desired.

    Monday, November 1, 2010

    One Year In

    Turkey Feta Meatloaf
    Exactly one year ago today, I started my blog.  It's been quite a year and I am amazed by how much I have learned.  I think back to how Ron and I used to eat prior to starting my blog.  I rarely cooked and when I did it was a total disaster.  Our big Friday night meals would consist of a bowl of Lucky Charms.  Some nights, when we felt like splurging, we'd eat sandwiches.  We would eat at restaurants often or buy prepared food from the grocery store.  We still do this, but it's not as frequent.  And it is rare that we rely on frozen boxed Lean Cuisines.

    I don't know if I mentioned this before, but I was inspired to learn how to cook after watching an episode of Chefography.  It featured Bobby Flay and there was a segment in which he talked about his wife and how he cooks for her.  I recall turning to Ron and saying, "Will you please go to culinary school so you can start cooking dinner for me?"  As you can imagine, it did not go over well.  After realizing my comment was completely irrational, I decided that perhaps I should be the one who learned how to cook considering it was I who was interested in eating healthy and new foods.
    Tomato Israeli Couscous Salad with Whole Wheat Sunflower Quick Bread

    So, here we are.  We don't exactly eat fine dining, but we do eat well, in our standards.  I still don't know how to prepare some things, but I'm / it's a work in progress.  I initially started this blog because I wanted to learn how to cook, track the recipes that I was making, and mark things that were worth making again.  There have been a number of kitchen failures, but overall meals have been relatively successful.  I'm much more confident in the kitchen now than when I started.  And, it shows.  It's easy for me to look at my pantry and come up with a quick meal.  One year ago, I couldn't even cook spaghetti, so I'd say my project was a success.  I've decided to go through my blog and pick one favorite recipe from each month.  But, I couldn't really just pick one so there are a few for some months.  Since starting the blog, it's rare that I make a dinner more than once (this is a learning to cook blog... not a learning to cook the same things over and over blog).  However, there have been a number of things that I crave, and Ron asks for often.  If you haven't made any of the recipes on my blog to date, I'd highly suggest checking out the ones I post below.  Sorry if it is an overwhelming list, but I was reminded about how good some of this stuff was!
    Pepper and Smoked Sausage Sandwich
    • November 2009:  This soup is such a simple soup.  I think it's called Pasta Fagioli because of the beans, but I should probably give it a new name after my most recent Pasta Fagioli.  I make this soup ALL the time.  It is so good and I absolutely LOVE the white pepper.  It is an ingredient I would highly recommend because I do not think the soup with taste the same without it.
    • December 2009:  I've basically never met a cookie that I don't like.  Cookies are just... good.  They are comforting and delicious.  These s'mores cookies turned out absolutely wonderful.
    • January 2010:  This lasagna was awesome.  It was hearty, it was healthy, and I totally forgot about it up until now!  Don't let that sway you... I just asked Ron if he remembered it and he said, "Yes, make that."  It's been added to the weekly menu, folks.  Add it to yours too!'
    • February 2010:  I stepped up my game in February, so I am going to cheat and post a bunch!  There were a ton of recipes that I loved.  But, my absolute favorite, and one you should definitely try, is this turkey feta meatloaf.  This dish has been made multiple times in my kitchen since finding the recipe.  It's a healthy, incredibly entree.
    • March 2010:  The best salmon recipe I've ever had was also the first time I was introduced to dill.  I use dill ALL the time now thanks to this sweet and tangy salmon recipe.
    • April 2010:  This was a good month for chicken recipes!  Chicken is a main staple ingredient in this house.  It's so easy to prepare and is such a versatile meat.  This roasted chicken was my favorite chicken meal that I've ever served.  
    • May 2010:  Soft pretzels!  So, so, SO good.  Ron requests these often.  Then, we slice them open and use them for ham and cheese sandwiches.  BUT, they are good just alone (or with mustard, as I prefer).
    • June 2010:  This is, hands down, the best couscous recipe I have ever made.  I LOVED this.  It was so, so good and it would be great for any lunch, dinner, or side dish at a BBQ.  
    • July 2010:  These crab cakes were amaze-balls.  Do not fear that this "healthified" version will take away flavor, because it doesn't.  Ron loved them.  My sister-in-law coined them the "best crabcakes ever."  My parents enjoyed them (and mom doesn't even like "fishy things") and even cooked them for my sister, who enjoyed them.  So, I highly suggest making them, so you can enjoy them too!
    • August 2010:  Hands down, the BEST pizza meal we've ever had.  Pizza pot pies!  Absolutely worth investing in some ramekins for these babies.
    • September 2010:  I love indian food, so I was very happy with how this recipe for chana masala turned out.  It totally satisfied by indian food craving!
    • October 2010:  Um, the absolute best recipe that came from my October archive was obviously my Harry Potter themed treat.  But, I'd also give high marks to the pasta fagioli I made a few weeks ago that made me crave leftovers even before I finished my dinner!