Search My Blog!!

Thursday, January 28, 2010

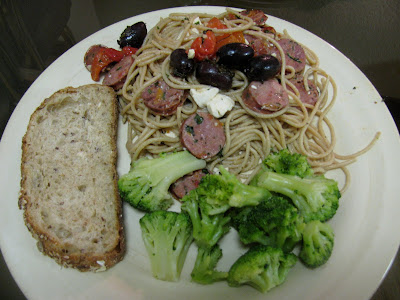
WW Pasta with Sundried Tomato Sausage and Feta

I've learned that I like pasta.  Before this blog, I used to hate pasta.  I'm afraid to admit that part of the reason I did not like pasta was because I could not cook the pasta.  I always failed.

I'm serious.  Every single time I tried to make spaghetti or any kind of boxed noodle, it somehow turned out like crap.  I had issues with stovetop ramen for a while in college.  It's pretty pathetic to think about how excited I was on the night that I "mastered" the 3 minute preparation for stovetop ramen.

Anyway, I've learned that I like pasta.  However, I do not like your typical pasta with marinara and meatballs.  That is where I run into a problem.  I prefer to have a "fancy pasta" meal.  This is how I will describe my pasta dishes from here on.  Fancy pasta.

For some reason, fancy pasta appeals to me.  When I think of a good pasta meal, I think of olive oil, oregano, basil, shrimp, chicken...  Yummy ingredients that pair really well with a nice glass of white wine.  I think of Italy.  Sadly, I've never been to Italy.  So, when I envision my happy "italian restaurant experience," I picture myself sitting in "France" in Epcot.  ????  I don't get it either.  It's strange, but whatever.  It keeps me happy.

Add this recipe to the fancy pasta top-ten list.  This stuff was incredible!  I made some variations to the recipe because I did not want to make a whole pound of pasta for 2 people.  The original recipe also called for some zucchini but I left that out.  You can check out the original recipe from the site by clicking the link below.

This meal only took about 20 minutes to make.  And, this meal is a must try.

Pasta with Sundried Tomato Sausage

adapted from the Aidells site
Yield:  4-6 servings
Ingredients
  • 1 pound dried pasta (penne, gemelli, rotini - I used WW linguine) 
  • 2 tablespoons olive oil
  • 4 links Aidells Sun-Dried Tomato Sausage, sliced ¼ inch thick (I used 3)
  • 1 roasted red pepper, sliced (I used about 1 cup of jarred roasted sweet red peppers)
  • 2 cloves garlic, chopped (or minced)
  • 1 cup white wine (I used about 3/4 c of white cooking wine)
  • 1 cup chicken stock (I used about 3/4 c of chicken broth)
  • 2 tablespoons basil, chopped
  • ½ cup Feta Cheese (or grated Parmesan) (I used the Atheno's Basil and Sundried Tomato crumbles)
  • Salt and freshly ground black pepper to taste 
  • Kalamata olives, if desired.
Instructions
  1. Cook the pasta in a large pot of well-salted boiling water until al dente. Drain well. 
  2. Add the sausage and cook for 2-3 minutes until beginning to brown. 
  3. Add the zucchini, roasted pepper and garlic. 
    1. This smells amazing!!
  4. Continue cooking, stirring occasionally, for 3-4 minutes. 
  5. Stir in the wine and stock and bring to a boil. 
  6. Lower heat to medium and simmer until slightly reduced. 
    1. I grew impatient for the sauce to reduce.  It wasn't and this might've had something to do with too much liquid/not enough ingredients.  I drained most of the liquid but reserved about 1/4 cup before I proceeded to step #8.  It still tasted delicious!
  7. Toss in the cooked pasta, basil and cheese. 
  8. Season to taste with salt and pepper.
  9. Sprinkle with kalamata olives, if desired.

Tuesday, January 26, 2010

Chicken Caesar Lite Pita

I'm starting to feel a bit "soft" in the middle.  This is not a good feeling.  Normally, running sheds those unwanted areas in a jif.  Cycling outdoors can normally take care of anything within 2 days.  However, it's still freezing out so no outdoor biking (unless I want to kill myself on the 2 inches of ice on our roads).  Plus, I've been taking it easy since the Goofy's Challenge.  My body needs the rest to recover from the stress I gave it a few weekends ago.  I've been attending my normal spin classes, kickboxing, strength training and doing pilates, but it's not the same... *Sigh.

Fortunately, 18 weeks of Half-Ironman training commences this Monday.  Phew. 

But, "my recovery period" is no excuse for my eating habits.  Honestly, I've slacked with intuitive eating.  I've grabbed chocolate moreso than normal.  And, I'm stressed.  I'm stressed because of effing school.  It's ALREADY taking its toll on my sleep and eating habits.  However, the second that training starts, I hope to be back on board within a week.
Tonight I decided to make up some chicken caesar pitas.  Technically, they are chicken caesar "lite" because I use the "lite" pre-packaged mix.  You can basically use any wrap/pita bread that you want.  I love the Flat-Out variety.  They are incredibly good and I probably eat a wrap 6/7 days for lunch.  I've used them for pizza before.  They are so easy to pile veggies in and take on the run!  Plus, they have tons of awesome recipes on their site for different kinds of wraps.  
Chicken Caesar Lite Pitas
No recipe, just off-hand (though I'm sure there are recipes out there somewhere)
Nutrition:  ~ 275 calories (with use of Flat-Out Artisan or some other pita/wrap at 100 calories)
Ingredients
  • Pita Bread (or Wraps, the Flat Out variety are my favorites.)
  • Shredded Chicken
  • Fresh Express Caesar Lite Bag
  • Grape tomatoes
  • Parmesan cheese, if desired (will add more to nutrition)
  • Croutons from bag, if desired (will add more to nutrition)
Instructions
  1. Get your wrap/pita and pile on!
    1. Start with lettuce.
    2. Mix 3 oz. shredded chicken with about 1 tbsp of caesar dressing from bag.
    3. Place chicken over lettuce.
    4. Slice up some grape tomatoes and layer on top of chicken.
    5. Drizzle about 1.5 tsp of caesar dressing over chicken.
      1. Sprinkle cheese, if desired and croutons for a crunch!
    6. Enjoy!!!
Someone was moody because they did not get any Fancy Feast tonight.  Someone is starting to get a little bit spoiled... and "soft" in the middle.  So, someone is also going to need to slim down and lay off the Fancy Feast.

Carrot Cake Breakfast Muffins

Ah, muffins.  One of my favorite things in this world.  Muffins can either be stuffed full of really good and healthy ingredients.  Or, muffins can be loaded up with butter and oil.

I've been used to the taste of "diet" foods for several years now.  It started with the earlier years of my OCD issues.  Oddly enough, the substitutions I got used to are now staples in my life.  I don't really eat stuff with oil and full fat anymore because I simply don't like the taste.  This is a good thing.

For the past several years, I've been making up my own batches of muffins for a quick on-the-go breakfast.  Ron normally stays away from them because I make stuff with lots of fruit.  I always substitute egg whites (or egg beaters) for eggs.  I often combine Splenda granulated sugar with regular sugar (when the recipe calls for a ridiculous amount of sugar).  I always try to incorporate some WW flour/flax seeds/wheat bran/wheat germ/oats into the recipe.  And, I always completely substitute or use 50% unsweetened/sweetened applesauce for the oil.

Despite all of these changes, I have made some incredible tasting "baked goods" that are significantly low in calories and fat, high in fiber and delicious!  Disclaimer:  This stuff tastes good to me.  It may not taste good for you, especially if you think that diet foods taste like a sponge :)

I found a recipe for some carrot cake breakfast muffins the other day and decided to see what I could do with the recipe.  I am obsessed with carrot cake.  It is such a delicious treat!  Why not have it for breakfast in muffin form?

These muffins are absolutely incredible.  Even better, they are about 300 calories and ginormous!  I normally eat a big bagel or some other type of carb-pumped breakfast food before my long training runs/bikes to keep me fueled for 3+ hours.  These will definitely be included in the rotating menu.  They are seriously awesome!!  Don't fear the giant chunks in my photos.  Obviously, you can shred your carrots or chop your apples even smaller.  But, the above is what you get if you come from my kitchen :)

I used chopped nuts in the recipe but I'm sure you can lower the calories by substituting wheat bran or wheat germ.  Yum!!

I've included my substitutions in the recipe that follow below.  However, you can check out the original recipe by clicking this link.  The original recipe nutritional stats (per muffin from a 12 muffin tin) were: 224 Calories, 11g fat, 37mg cholesterol, 225mg sodium, 29g carb, 3g fiber, 4g protein.

My substitutions would make the muffins:  145 calories, 3.5g fat.  However, I chose to make super large muffins.

*I've made this recipe with some changes recently.  I've noted them below in red.

Carrot Cake Breakfast Muffins 
adapted from Recipe Rhapsody
Yield:  12 regular size muffins or 6 large size muffins
My Nutrition Stats (for 6 large muffins):  w/ Glaze:  ~290 calories, ~7g fat (nearly all grams are from cream cheese + icing), w/o Glaze:  ~270 calories, ~6g fat (nearly all grams are from nuts)
w/ changes:  ~ 300 calories, ~6g fat
Sorry I don't have other information.  I'm too lazy :)
Ingredients 
Muffins
  • 1/2 c egg beaters (or 2 eggs)
  • 1/3 c applesauce
  • 1/4 c FF milk
  • 1/4 c agave nectar (or honey)
  • 1/4 c SF breakfast syrup
    • The above can be substituted for another 1/4 c agave nectar (or honey) to equal 1/2 c. 
  • 1 1/2 tsp pure vanilla extract
  • 1 c whole wheat flour
  • 1/2 c all-purpose flour
    • Or omit AP flour altogether and add another 1/2 c whole wheat flour to total 1 1/2 c whole wheat flour
  • 1/2 c wheat bran
  • 1 tsp baking soda
  • 1 tsp baking powder
  • 1 1/2 tsp cinnamon
  • 1/4 tsp nutmeg
    • Or 1/4 tsp pumpkin pie spice
  • 1/4 tsp salt
  • 1 1/2 c store-bought shredded carrots
  • 1 large or 2 small sweet apples, peeled, cored, and finely chopped (I used Fuji, had about 3/4 cup of chopped apple) 
  • 1 small box (1.5 oz) of raisins
  • 1/4 c + 2 tbsp chopped pecans (Measure out as whole nuts, then finely chop)
    • Or combination of pecans and walnuts
Glaze

  • 1 oz Neuchâtel cheese (low-fat cream cheese)
  • 1 1/2 tsp honey 
Instructions
  1. Preheat the oven to 350F and put paper liners in your muffin pan or spray with baking spray.
  2. Beat together the egg beaters, applesauce, milk, agave nectar, syrup, and vanilla. 
  3. In a separate bowl mix together the flours, baking soda, baking powder, cinnamon, nutmeg, and salt. 
  4. Lightly stir the wet ingredients into the dry, then fold in the carrot, apple, and nuts. 
  5. Fill the muffin tray and bake for 18-20 minutes (if using 12 regular size muffin tin), 24-26 minutes (for a 6 large muffin tin) or until a toothpick inserted in the center comes out clean. 
  6. Cool on a wire rack.
  7. To make the glaze, warm the Neuchâtel in the microwave, then stir in the honey. 
  8. Drizzle the glaze over the top of the cooled muffins with a fork, or put it into a Ziploc bag, cut the corner, and squeeze it over the muffins while sweeping the bag back and forth. 

Monday, January 25, 2010

Espresso Coffee Cake Muffins

I must be feeling bad.  I haven't been in the best frame of mind since returning from break/Pittsburgh/FL.  I appear to be unpleasant about being back in "school mode" (or lack thereof) and this must be translating over to "bad significant other'ing."  To clarify, I've been pretty testy lately and Ron is once again, pissed, that I chose to go to law school.

Hence, the weekend of Ron-approved foods.

These were very simple to make.  They smelled amazing while baking.  They certainly look very appetizing.  And, I tried one small bite and they are absolutely INCREDIBLE!!  However, I stopped at one bite :( and I chose to eat an apple instead.  Call me crazy (or a prude), but anything that leaves dabs of butter in the muffin tin and soaks through the muffin wrapper isn't appealing for a wholesome breakfast.  I love baking, but I've been getting better at making healthier muffins and I'm saving up for my Tuesday breakfast carrot cake concoction :)

Espresso Coffee Cake Muffins
adapted from Cinnamon Spice and Everything Nice
Yield:  I got 11 muffins.
Ingredients
For Muffins
  • 1 and 1/2 cups flour
  • 1/2 cup sugar
  • 2 teaspoons baking powder
  • 1/2 teaspoon salt
  • 1 tablespoon instant Espresso(can be doubled for a stronger flavor)
  • 1 tablespoon boiling water
  • 1/2 cup butter, melted
  • 1 egg
  • 1/3 cup milk
  • 1 teaspoon vanilla extract 
For Topping
  • 1/4 cup packed brown sugar
  • 1/3 chopped almonds (I used pecans because that's what I had in the cabinet)
  • 3 tablespoons flour
  • 1 and 1/2 tablespoons butter (I chopped up into mini pieces and put in microwave for 10 sec. ) 
For Glaze (See recipe below) 
Instructions  
  1. Preheat oven to 375 degrees.
  2. In a large bowl combine the flour, sugar, baking powder, and salt. 
  3. In a small bowl dissolve the Espresso in the boiling water. 
  4. Add to flour mixture with the butter, egg, milk, and vanilla.
    1. Stir to combine, don't over mix. Batter will be thick.
  5. Fill muffin tin/baking cups 3/4 of the way. 
  6. Sprinkle with the topping, dividing equally among the muffins, press into batter gently.
  7. Bake for 18-20 minutes until toothpick comes out clean. 
  8. Drizzle with glaze (see recipe below).
For Glaze
  • 1/2 teaspoon instant Espresso
  • 1 teaspoon boiling water
  • 1/4 cup packed brown sugar
  • vanilla extract, a drop
  • 1/4 cup confectioners' sugar
  • 2-3 teaspoons milk
  1. Dissolve the Espresso into the boiling water in a small bowl. 
  2. Add the brown sugar and use a fork to combine the two. 
  3. Add a drop of vanilla. 
  4. Add the confectioners sugar and 2 teaspoons of the milk. 
  5. Whisk until well combined. 
    1. If glaze is thick add another teaspoon of milk.  Whisk. 
  6. Drizzle over the warm muffins.

Sunday, January 24, 2010

Individual Salmon and Wild Rice Salad

Tonight was a leftover night.  Ron was eating the soup, so I decided to make myself up a salmon salad.  It's fantastic!

I'm a big fan of making hearty, but healthy, salads.  This flavor combination may not seem good to you, but I can assure you that it's the perfect mix of veggies and saltiness.  The rice, olives and salmon make the lettuce so flavorful that I don't even use dressing.


I always use the No-Name brand salmon fillets.  I fell in love with these a while back and I always have them on hand.  They can be a bit pricey ($17.99 for 4 fillets) but I always pick up a few boxes when they go on sale at our local stores (for $9.99).  I'll stock up and by the time I need replenished, they are normally on sale again :)  They are around 270 calories (or probably closer to 300 thanks to the FDA's 20% rule).  With the rice and depending on what else you add, you can easily keep this hearty meal under 500 calories.  Fortunately, salmon has the "good fats" too so you get your Omega-3's.

This is one of my favorite salads to whip up for an individual meal.

Salmon and Wild Rice Salad
Created by Me!
Yield:  1 serving
Ingredients:
  • 5 oz. salmon fillet (I use No-Name brand.  These can be found in frozen section of grocery stores.)
  • 3-4 cups of greens (Use any kind you prefer; spring mix, spinach, romaine, etc.)
  • 1/4 cup of diced yellow onion
  • 1/2 cup diced carrots
  • Kalamata olives
  • 1/8 cup of shredded cheese
  • 2/3 cup of rice (Use any kind you prefer)
Instructions
  1. If using packaged salmon, prepare as instructed on package.  If using fresh salmon, well hell, I've never made my own before so good luck :)
  2. Place lettuce, veggies, olives and cheese into individual salad bowl.
  3. Heat up some rice (to your preference; minute rice, stovetop, microwave, etc...)
  4. Add rice to your salad bowl.
  5. Add salmon to your salad bowl.
  6. Cut salmon into salad.  Mix and Enjoy!

Meatball and Ravioli Soup


I'm starting to think I have a bit of a soup problem.  However, it is an easy way to get a wholesome meal.  I love chopping up veggies and throwing them in the pot.  I love buttering up a slice of some WW bread and dipping it in my soup.  Overall, it's always a fun way to have a nutritious and filling meal.

However, Ron's been getting angry with all of the vegetables I've been throwing in so I decided to make a soup that is on par with his taste preferences.  I found a recipe for a soup with minimal vegetables, meat and pasta.  It included all of his favorite things!
 
As I am sure you can imagine, I was not particularly thrilled with this soup, so I doubt I will be making it again.  The soup tasted good; I understand how it could actually be very good to a person, but I just wasn't a fan of all of the meat and ravioli.  So, I won't be eating any of the leftovers.  Ron will and considering he loved it, I'm sure he's OK with that.


I guess I'm strange, but I don't like the taste of red meat and I get sick from it.  I used grass-fed beef but I still got sick.  I also don't like ravioli and never have liked ravioli.  So, chalk this one up as a loss for me but a plus for Ron (he ate two big bowls) and probably a great majority of people in the world who don't have such picky taste-buds.  


Mini Meatball and Ravioli Soup

Ingredients
For the Soup:
1 large Yellow Onion, diced
1 Green Bell Pepper, diced
Olive Oil, for sauteing
Salt and fresh pepper
5 cloves Garlic, minced
1 Bay Leaf
1 tablespoon fresh Parsley, chopped
1 teaspoon Italian Seasoning
1 teaspoon Thyme
3 - 14 ounce cans Chicken Broth(5-6 cups)
1 - 14 ounce can diced Tomatoes
1 - 13 ounce bag of frozen Mini Cheese Ravioli
1 and 1/2 cups Frozen or Fresh Chopped Spinach
Fresh Grated Parmesan or Romano for serving

For the Meatballs:
1 pound Ground Beef (85%)
1/4 cup finely diced Yellow Onion
4 cloves Garlic, minced
1 tablespoon fresh Parsley, chopped
1 teaspoon Italian Seasoning
1 teaspoon Worcestershire sauce
3/4 teaspoon Salt
1/3 teaspoon Black Pepper
1 Egg, beaten
1/4 cup Italian Bread Crumbs

For the Garlic Croutons (or just use pre-purchased croutons)
2 cloves Garlic, minced
1 tablespoon Olive Oil
2-3 tablespoons Butter
1 roll, or thick sliced bread, cubed
a few fresh Parsley leaves, minced

Instructions
1. In a large soup pot saute the onion and bell pepper in two tablespoons Olive oil until soft and tender, season with salt and pepper. Add the garlic, saute until fragrant. Add the parsley, Italian seasoning, thyme, chicken broth, and tomatoes. Bring slowly up to a boil. In the meantime make the meatballs.

2. Combine all the meatball ingredients in a large bowl. Measure out two teaspoons and form into a ball. Measure out a few to use as a guide for making the rest.

3. Once the soup is boiling carefully drop the meatballs into the pot using a spoon. Bring back to a slow simmer and continue simmering for ten minutes.

4. Turn up the heat and carefully add the mini raviolis and the spinach. Bring back up to a simmer and continue simmering for ten more minutes or until ravioli are cooked through. Don't cook past this - the meatballs will begin to fall apart. In the meantime make the croutons.

5. To make the croutons saute two cloves garlic in one Olive oil until fragrant. Add two - three tablespoons butter, the cubed bread, and the parsley. Cook over medium-low heat, turning to get all sides browned.

6. Serve topped with croutons and with plenty of Parmesan Cheese.

Friday, January 22, 2010

Crockpot Thai Chicken


I often forget about my crockpot, but I've designated Thursdays as the official crockpot night.   Hopefully this thing gets used more often!

Unfortunately, there is no picture of the finished product.  This is because we ate it all and I was so hungry that I forgot to spare 2 seconds to take a picture!

I found a simple crockpot recipe for Thai inspired pork and decided to sub in chicken for the pork.  The recipe said that you could serve this over rice.  However, I decided to use the rice to make up a wrap sandwich and came up with a delicious wrap for dinner!

As mentioned above, there is no picture of the finished product.  I am unable to eat on Thursdays due to school so I come home ravenous.  I didn't even take my jacket off before I started fixing up my food.  In my defense, crockpots make the entire apartment smell good (including the hallway) so I was pretty dang hungry by the time I got inside.

This wrap was incredible!  I mixed up the chicken, heated up one of the 60 second rice bowls, pulled out a wrap, sprinkled some chow mein noodles/peanuts on top and had a meal.  My side was a buttload of carrots.  Seriously, this is incredible.  Try it!


Crockpot Thai Chicken
chicken adapted from Savour Fare 
Yield:  4 servings
Ingredients
  •  For Main Course: 
    • Nonstick cooking spray
    • 2 pork tenderloins (about 1 lb. each, each cut in thirds) (or 1 lb. chicken breasts)
    • 2 large red bell peppers, cored, seeded, cut into strips
    • 1/3 cup prepared teriyaki sauce
    • 2 tablespoons rice vinegar
    • 1 teaspoon prepared Thai red curry paste (optional)
    • 2 cloves garlic, minced
    • 1/4 cup creamy peanut butter
Instructions
  1. Cook on low for 8 hours.
  2. Remove pork (or chicken) from the crockpot and shred. 
  3. Add peanut butter to liquid in cooker, stir to combine, then return meat to the cooker and toss so the sauce coats the meat.
  4. Prepare wrap
    1. Place as much cooked rice in wrap as you want.  (or Serve on a roll w/ some type of thai flavored slaw)
    2. Add chicken/pork.
    3. Add additional items:  Sprinkle some chow mein noodles, peanuts, cashews, green onion, chopped yellow onion, etc.  Whatever flavor you want.  Ron added some hot sauce, but said the peanuts made it the best.
    4. Roll up and enjoy!!

Tuesday, January 19, 2010

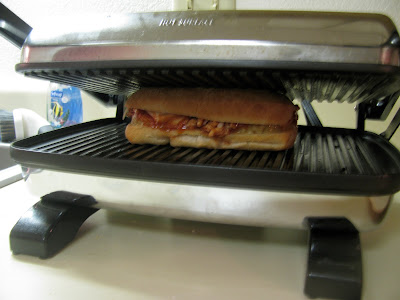
My Own Version of Earl's "Hawaiian BBQ" Sandwich


On our first trip to Disney in 2008, Ron and I discovered the Earl of Sandwich shop in Downtown Disney.  I ate a sandwich there and my idea of sandwiches has been forever changed.  I can no longer settle for a "turkey on wheat" or "meatball sub."  If it is not Earl's quality, it is not worth eating.  These sandwiches are incredible and the same price as a nasty, disgusting Subway sandwich.  Not to mention, the folks at Earl use fresh ingredients and quality tasting bread!

Others may not enjoy this sandwich shop as much as I did.  However, I believe that everyone had an enjoyable experience eating at Earl's this past January.  Over the next few days, I will attempt to recreate some of the sandwiches on their menu.  I am ecstatic about this.  I've made the Hawaiian BBQ sandwich in the past, but never with these rolls.  I've normally shoved everything in a wrap and made up a quesadilla (which is just as tasty).

I made the sandwich tolerable for me and my food allergies.  That meant no ham and only a little bit of cheese.  It still turned out absolutely incredible!!  If you were to add ham and cheese, tailor it to your preference.  It's very simple.


Earl's Hawaiian BBQ Sandwich
Earl's Description:  Grilled Chicken, Roasted Ham, Hawaiian Bbq Sauce, Aged Swiss Cheese & Fresh Pineapple

Ingredients
  • Bread (I used Filone rolls, but you could easily use any hearty bread purchased from the bakery  *I do not advise using any type of store-bought loaf bread*)
  • Chicken (either slices of grilled chicken or shredded)
  • Hawaiian / Sweet and Zesty BBQ sauce (many grocery stores carry specialty bbq sauces.  I suggest splurging for an authentic tasting sandwich).
  • Pineapple rings or tidbits with juice
  • Ham (optional)
  • Swiss cheese (optional)
Instructions
  1. Prepare chicken:  If using shredded chicken, prepare as directed from recipe above.  If using grilled chicken, cut chicken into strips to place on bread.
  2. Prepare panini grill as directed.  
    1. You could also use a stovetop pan, oven or toaster oven to heat through and get desired crispness.
  3. Slice roll in half.
  4. Layer pineapple rings or tidbits on bottom half of roll. 
  5. Mix about 2.5 tbsp of BBQ sauce w/ 1.5 tsp of pineapple juice.  Use more BBQ, if needed. 
  6. Mix about 2/3 cup of shredded chicken with BBQ sauce.
  7. Layer chicken mixture on top of pineapple rings.
  8. If using cheese, lay cheese over chicken.
  9. If using ham, lay ham slices on top of cheese.
  10. Place sandwich on grill or pan.  
  11. Spray top with olive oil cooking spray.
  12. Close lid and grill for 3.5 minutes or until sauce/cheese begins to bubble and bread is crusty.
  13. Serve with a side salad or some baked BBQ chips.  Enjoy!!


Monday, January 18, 2010

Millionaire Bars (aka "Grown-Up Twix Bars")


I'm still baking.  It's hard to stop once I've started.  I had the ingredients on hand and I've had this recipe bookmarked for several, several months.  Besides, it's not too bad if you only eat a tiny smidge and then pass it on.  Ron will be taking 98% of these with him to work tomorrow.

These are pretty good!  Then again, when does anything considered a "baked good" never not taste good?  If you find something, let me know.  However, I doubt I'll be making them again.  There are other goodies to try that turn out much better.

I've been experimenting with everything lately.  Why not try my hand at home-made Twix bars?  There are 3 steps to making the millionaire bars.  It pretty much involves:  1)  making cookies, 2) heating up milk and 3) melting chocolate.  They are called millionaire bars because of their rich flavors.

I decided just to use the short-cut method for step #2 and used store-bought Dulce de Leche.  I initially started with the condensed milk and subsequently realized that it might turn disastrous.  I kept hearing whistles coming from the pot.  No thank you. 

You can find Dulce de Leche at most grocery stores.


Millionaire Bars
adapted from Long Distance Drive who adapted from Joy of Cooking

Ingredients broken into 3 step Instructions

Shortbread Crust:
  • 1 1/2 sticks (3/4 cup) unsalted butter, room temp
  • 1/4 cup granulated sugar
  • 1 teaspoon vanilla
  • 1/8 teaspoon salt
  • 1 1/2 cups unbleached all-purpose flour
  1. Preheat oven to 350* and lightly grease a 9 x 9 baking pan.
  2. Cream the butter and sugar until fluffy. 
  3. Add vanilla and salt. 
  4. Stir in the flour just until the dough begins to come together in walnut-sized chunks. 
  5. Press the dough into the prepared pan and bake 20 minutes or until golden brown around the edges. 
  6. Cool completely. 
  7. Begin the filling as soon as the crust goes into the oven.

Caramel Filling:
  • 1 (14 oz) can sweetened condensed milk (or 1 x 14 oz can of Dulce de Leche)
  1. Pour the milk into a heavy saucepan and cook over low heat, stirring often, 60-90 minutes, until golden brown. 
  2. Alternately, cook the caramel in a double boiler, covered, stirring occasionally (every 15 minutes or so). 
    1. The only difference in the methods is the amount of attention given the caramel and the tools needed.  
  3. When thick and deep golden, spread caramel evenly over cooled crust and refrigerate until caramel is cool and set.
  4. If using Dulce de Leche, once shortbread has cooled, heat the caramel (in microwave or double boiler) and pour it over the cookie base.

Chocolate Topping
  • 6 ounces good-quality dark or semi-sweet chocolate (I used Ghiradelli 60% Cacoa - strongly advised to use good chocolate because it is one of the more dominant flavors in the recipe)
  • 1 Tablespoon butter
  • Coarse sea salt (optional but recommended)
  1. Melt the chocolate and butter slowly over low heat and spread over the cooled caramel layer. 
  2. Sprinkle sea salt over the chocolate. 
  3. Refrigerate until set. 
  4. Slice and enjoy.  Store the bars, covered, in the fridge.

Sunday, January 17, 2010

Turkey and Spinach Lasagna


Ok, enough baking.  However, I do have another post from what I made today that I will be posting tomorrow.   But, the kitchen is currently closed to baking (with the exception of some healthy muffins later this week).

Ron's been requesting lasagna so I looked for a hearty recipe that was healthy.  I found a wonderful recipe from Cooking Light that received "outstanding" ratings so I decided to give it a go.  My goodness!!  This stuff IS outstanding.  It makes a ton for leftovers and I found myself eating a whole other piece as I packed it into containers.

I highly recommend this lasagna.  It is incredible and you can easily adjust the amount of cheese you use and add additional seasoning.  It's pretty healthy (in lasagna world) and definitely satisfies any cravings.


Serve this with a salad (or other green veggie) and some hearty bread!  I used some broccoli and garlic light toast at 65 calories a slice.  Not bad for a Sunday dinner :)


Turkey-Spinach Lasagna
adapted from Cooking Light
Yield:  9 servings
Nutrition: Calories: 352, Fat: 10.6g (sat 4.5g,mono 3.4g,poly 2.2g) Protein: 28.3g, Carbohydrate: 35.6g
Ingredients
  • Cooking spray
  • 1  pound  ground turkey breast
  • 1 1/2  cups  chopped onion
  • 2  garlic cloves, chopped
  • 2  (26-ounce) jars low-fat marinara sauce
  • 1  (16-ounce) carton fat-free cottage cheese
  • 1/4  cup  egg substitute
  • 1/4  cup  (1 ounce) preshredded fresh Parmesan cheese
  • 1  tablespoon  dried parsley flakes
  • 1/4  teaspoon  black pepper
  • 1  (10-ounce) package frozen chopped spinach, thawed and drained
  • 8  cooked lasagna noodles
  • 2  cups  (8 ounces) shredded part-skim mozzarella cheese
Instructions
  1. Preheat oven to 350°.
  2. Coat a large skillet with cooking spray, and place over medium-high heat until hot. 
  3. Add turkey, onion, and garlic; cook until meat is browned, stirring to crumble. 
  4. Add 5 3/4 cups marinara sauce; cook 5 minutes, stirring occasionally. 
  5. Remove from heat.
  6. Combine cottage cheese, egg substitute, Parmesan, parsley, pepper, and spinach; stir well.
  7. Spread remaining marinara sauce in bottom of a 13 x 9-inch baking dish coated with cooking spray. 
  8. Arrange 4 noodles over marinara; top with cottage cheese mixture and half of the mozzarella. 
  9. Spoon half of the turkey mixture over the mozzarella. 
  10. Arrange the remaining noodles over turkey mixture. 
  11. Top with remaining turkey mixture and mozzarella.
  12. Bake at 350° for 50 minutes or until cheese melts and sauce is bubbly. 
  13. Let stand 10 minutes before serving.
  14. ENJOY!
I finished my box of clementines today.  :(  On to the store for more!  Someone wouldn't let me get rid of the box though.  

Saturday, January 16, 2010

Snickerdoodles


I decided to use a different snickerdoodle recipe than Mom's.  I felt guilty doing it, but I've been on a quest to find the *ultimate* recipe for your standard cookies (Chocolate Chip, Peanut Butter, Sugar, etc.) and this one tops the list!  Ron referred to them as "the best snickerdoodles I've ever made." 

Sorry, Mom!  But, all I changed was the butter addition and added vanilla.  It's amazing how a little bit of tweaking can change the entire taste, texture and experience :)

These cookies are unbelievably good.  I left them in for 8 minutes, 15 seconds and removed them instantly to cool on wire racks.  You really only have to leaves these in the oven just until they set.  They finish cooking on the wire racks.  They have a wonderful cake center and are so buttery and delish!  I'm glad I waited to have my "marathon dessert" until now.  Yum!

Note:  I've made snickerdoodles in the past and added cinnamon baking chips to the batter.  These are technically called "cinna-doodles."  To make cinna-doodles, add 1/2 bag of cinnamon baking chips to the batter after you've blended the dry ingredients into the wet.  Trust me, they make them taste even better!!


Snickerdoodles
adapted from Jules Food who adapted from All Recipes (look here for additional comments)
Yield:  48 cookies (or 24 if you cut the recipe in half)  The recipe that follows is for a full batch, however it can easily be cut.
Ingredients
  • 1/2 cup butter, softened 
  • 1/2 cup shortening (I used butter flavored, but the original recipe called for vegetable shortening)
  • 1 1/2 cups white sugar 
  • 2 eggs 
  • 2 teaspoons vanilla extract 
  • 2 3/4 cups all-purpose flour 
  • 2 teaspoons cream of tartar 
  • 1 teaspoon baking soda 
  • 1/4 teaspoon salt 
  • 3 tablespoons white sugar 
  • 3 teaspoons ground cinnamon 
Directions
  1. Preheat oven to 400 degrees F.
  2. Cream together butter, shortening, 1 1/2 cups sugar, the eggs and the vanilla. 
  3. Mix the dry ingredients in a separate bowl; then blend in the flour, cream of tartar, soda and salt into the wet ingredients.  Mix just until blended.
  4. Shape dough by rounded spoonfuls into balls.
  5. Mix the 3 tablespoons sugar and the cinnamon. 
  6. Roll balls of dough in mixture. 
  7. Place 2 inches apart on ungreased baking sheets.
  8. Bake 8 to 10 minutes, or until set but not too hard. 
  9. Remove immediately from baking sheets or...as immediately as possible.

Whole Wheat Cinnamon Raisin Bagels


I had noticed an unfortunate trend in my recent blog posts.  There was no baking!  While it was probably good for my waistline, it was not good for my soul or mental focus.  Today is a baking day; bagels and cookies! There was so much leftover soup that tonight's planned dinner can wait another night.  However, I must bake!!

I've always wanted to make my own bagels.  I am a huge fan of buying purchased bagels and freezing them, but I've wanted to test my own ability to bake up my favorite breakfast treat.  I found a good recipe for cinnamon raisin bagels online and bookmarked it.  I had a lot of time to kill today (aka a lot of time to put off schoolwork) and made these up.

The were actually pretty easy to make.  I only swore about 3 times when kneading the dough.  That's about 35 times less than normal, so I must've been doing OK (or my Disney calm was still with me).  I might add more cinnamon next time, but overall these are delicious!!

Plan to devote a lot of time (about an hour) towards prepping them.


Whole Wheat Cinnamon Raisin Bagels
adapted from Eating Well 
Yield:  12 servings.  261 calories per 3 oz bagel.  (More nutrition on E.W. link above)
Ingredients
  • 1 cup raisins
  • 1 1/2 cups lukewarm water
  • 1/4 cup packed light brown sugar
  • 2 tablespoons honey
  • 4 teaspoons active dry yeast
  • 1 tablespoon canola oil
  • 1 1/4 cups whole-wheat flour, or white whole-wheat flour
  • 4 teaspoons ground cinnamon
  • 1 tablespoon kosher salt
  • 3-4 cups bread flour
  • 1 large egg white, lightly beaten
Kettle water
  • 6 quarts water
  • 2 tablespoons packed light brown sugar
Directions
  1. Put raisins in a small bowl and add enough boiling water to cover; let stand for 5 minutes. Drain and blot dry with a paper towel.
  2. Whisk lukewarm water, 1/4 cup brown sugar, honey, yeast and oil in a large bowl until the yeast dissolves. 
  3. Stir in whole-wheat flour, cinnamon, salt and the raisins. 
  4. Stir in enough of the bread flour to make a soft dough, about 2 1/2 cups.
  5. Turn the dough out onto a lightly floured surface.  Knead, gradually incorporating more flour, until the dough is smooth and quite firm, 10 to 12 minutes. 
  6. Cover with a clean cloth and let rest for 10 minutes.
  7. Divide the dough into 12 even (good luck) pieces.  Roll each piece into a 10-inch-long rope.  Form bagels by overlapping the ends by 1 inch.  Pinch together firmly.  
  8. Set the bagels aside, uncovered, to rise until slightly puffy, about 20 minutes.
  9. To prep for kettle & bake bagels (while bagels are rising): Preheat oven to 450°F.   Line 1 large or 2 small baking sheets with parchment paper.  Bring 6 quarts water and 2 tablespoons brown sugar to a boil in a large pot.
  10. To Kettle after rising:  Slip several risen bagels at a time into the pot.  (The water should be at a lively simmer.)  Cook for 45 seconds, turn them over with a slotted spoon or tongs and cook for 45 seconds longer.  Remove the bagels with a slotted spoon and drain on a clean kitchen towel.  
  11. Place on the prepared baking sheet(s). Brush with egg white.
  12. Place the bagels in the oven, reduce heat to 425° and bake for 15 minutes. Turn the bagels over and bake until golden brown, about 5 minutes more.
Wow, they are fantastic!! 
  • Make Ahead Tip: Freeze fresh (and properly cooled) bagels immediately unless you are eating them all that day.
  • If you like, substitute the new white whole-wheat flour for the regular whole-wheat flour in this recipe. You will get a lighter texture but have all the nutrition found in regular whole-wheat.  (I used a decent WW flour, preferably King Arthur, as opposed to Gold.)


Friday, January 15, 2010

Minestrone Soup w/ Potatoes

I was craving a good soup recipe but I did not want to make the same minestrone recipe I make all the time.  I had bookmarked a minestrone soup recipe that used potatoes not too long ago so I decided to try it out.

I did not purchase a fennel bulb so I left that out.  I also mistakenly used a can of tomatoes that were entirely crushed (not just slightly) so I didn't have the tomato chunks in the soup that I would have preferred.  Lastly, I did not include the red wine vinegar.  I only have apple cider and figured that might make the soup taste disgusting.

I added a few carrots and used Barilla WW small shells for the pasta.  Overall, it turned out pretty good but it made a ton of soup!  Looks like I'll be eating soup for lunch over the next few days.

Serve with some hearty bread and enjoy!


Winter Minestrone Soup with Potatoes
adapted from The Urban Spork
Yield:  A LOT!  But, the site says 6-8 servings.
Ingredients
  • 1/2 medium onion, cut into 1/2 inch pieces
  • 2 stalks celery, sliced crosswise into 1/2 inch pieces
  • 1/2 bulb fennel, cut into 1 inch pieces
  • 2 medium Yukon gold potatoes, peeled and cut into 1-inch cubes
  • 2 cloves garlic, finely chopped
  • 1 tablespoon olive oil
  • 1-35 oz. can whole tomatoes, lightly crushed
  • 8 cups low-sodium chicken stock
  • 1-15 oz. can cannellini beans, drained and rinsed
  • coarse salt and freshly ground pepper
  • 2 teaspoons red-wine vinegar
  • 1  1/2 bunches Swiss Chard leaves, thinly sliced (I used spinach leaves)
  • 2 cups short pasta, for serving
  • freshly grated Parmesan cheese, for garnish
Directions  
  1. Heat oil in a large stockpot over medium high heat.  
  2. Add onion, celery, fennel, potatoes and garlic.  
  3. Cook, stirring occasionally, about 5 minutes.
  4. Add tomatoes and their juices, stock and cannellini beans; season with 2 teaspoons salt and 1/2 teaspoon pepper. 
  5.  Increase heat to high and bring to a boil.  
  6. Reduce heat to a simmer and cook until potatoes are tender, about 10 minutes.
  7. Stir in vinegar and Swiss chard; season with salt and pepper.
  8. Prepare the pasta to al dente by following the directions included with the pasta.
  9. Divide pasta evenly between bowls.  
  10. Ladle soup over the pasta and garnish with cheese.  
  11. Serve immediately and enjoy!!

Thursday, January 14, 2010

Kielbasa and Potatoes


I came home tonight and did not feel like cooking.  However, I was home relatively early and wanted to make something.  When I get home early enough, I want a meal.  I decided that from here on out, Thursdays will be a slow-cooker night.  I have enough time to prep before I leave for work/school and it can be ready as soon as I walk in the door!

This recipe is the true definition of a "meat and potatoes" meal.  Ron really enjoyed it.  It was extremely quick and easy to prepare.  It was hearty and good!  I served with some broccoli (for myself) and some grain bread.


Kielbasa and Potatoes
adapted from Life's Ambrosia

Yield:  2 hearty, hearty servings (or 2 servings with leftovers)
Ingredients
  • 1 tablespoon olive oil
  • 1 tablespoon butter
  • 3 medium Yukon gold potatoes, diced
  • fresh cracked pepper and kosher salt
  • 1/2 medium onion chopped
  • 1 pound turkey kielbasa, cut in half at the curve and then sliced
Directions 
  1. In a large skillet heat olive oil and butter over medium heat. 
  2. Once butter has melted add potatoes. 
  3. Sprinkle with salt and pepper. 
  4. Allow to cook for 4-5 minutes without stirring.
  5. Stir after 5 minutes. 
  6. Cook another 5 minutes.
  7. Stir.
  8. Stir in onions. 
  9. Cook 3 minutes. 
  10. Stir in kielbasa. 
  11. Continue cooking for 5 more minutes or until sausage is warmed through and pieces begin to brown.
  12. Serve hot.
Note: If you use beef kielbasa cut the amount of butter and oil slightly or the dish may turn out a little greasy.! 

Tuesday, January 12, 2010

Slow Cooker Jambalaya

Back from a WONDERFUL trip to Disney World w/ Ron, Mom and Dad.  I was very content and only had a few minor food mishaps :)

In Orlando, Ron and I ate at a Blues restaurant.  We shared some gumbo and he requested it for when we got home.  However, I was too tired to deal with a roux the day we got back home so I opted for a slow-cooker jambalaya recipe.  This is a great go-to recipe that takes minimal time to prepare and is delicious.  I served with some slices from a hearty seed and grain boule and a mixture of some ready rice (Cajun style and brown) that took about 90 seconds to make.  I followed the recipe to a T, but I think I added 12 oz of sausage to make up for all of the veggies I added.

Slow Cooker Jambalaya
adapted from Food Network.com
Yield:  4 servings
Ingredients
  • 1 pound boneless skinless chicken breasts, cut into 1-inch cubes
  • 1/2 pound andouille sausage, diced
  • 1 (28-ounce) can diced tomatoes
  • 1 medium onion, chopped
  • 1 green bell pepper, seeded and chopped
  • 1 stalk celery, chopped
  • 1 cup reduced-sodium chicken broth
  • 2 teaspoons dried oregano
  • 2 teaspoons Cajun or Creole seasoning
  • 1 teaspoon hot sauce
  • 2 bay leaves
  • 1/2 teaspoon dried thyme
  • 1 pound frozen peeled and cooked shrimp, thawed
  • 2 cups cooked rice
Directions
  1. In a slow cooker, combine chicken, sausage, tomatoes, onion, green pepper, celery, and chicken broth. Stir in oregano, Cajun seasoning, hot sauce, bay leaves, and thyme.
  2. Cover, and cook on LOW for 7 hours or on HIGH for 3 hours. 
  3. Stir in the thawed shrimp, cover and cook until the shrimp is heated through, about 5 minutes. 
  4. Discard bay leaves and spoon mixture over cooked rice.

Monday, January 4, 2010

Chicken Breast Roasted on Tomatoes and Eggplant with Oregano


Did Ron eat the eggplant or tomato?  No.
Did I?  Yes, I ate two servings.
Did we both enjoy the meal?  Very much so!
= A success.


I'm trying to use foods that I don't often eat.  Today's experiment was with eggplant.  I will be making this recipe again.  It was very easy, very light and very tasty!  I served with some mashed potatoes and some light garlic toast.


Chicken Breast Roasted on Tomatoes and Eggplant with Oregano
adapted from Once Upon a Plate
Yield:  4 servings.
Ingredients
  • 1 eggplant
  • 3 Roma, or other ripe tomatoes
  • 1 Tablespoon fresh oregano leaves (or 2 teaspoons dried, crumbled)
  • sea salt and freshly ground pepper (coarse grind)
  • 4 chicken breast fillets
  • 1/2 cup grated parmesan cheese
  • 1/2 cup grated mozzarella cheese
Directions
  1. Preheat oven to 350* (F)
  2. Line shallow rimmed baking pan with a silpat liner or parchment paper (for easy clean-up.)
  3. Thickly slice eggplant (one slice for each chicken breast), place on lined baking pan, top with sliced tomatoes, oregano, salt and pepper.
  4. Arrange chicken breasts on top of each eggplant/tomato stack. (Brush on or spray lightly with olive oil.)
  5. Bake for 10 to 15 minutes, remove from oven and sprinkle each evenly with the mozzarella and parmesan.
  6. Continue baking until chicken is cooked through and cheese is bubbling and lightly browned. This will depend upon thickness of the chicken breasts. The average size breasts I used required an additional 25 to 30 minutes baking time. 
    1. (Test with instant thermometer to make sure chicken is cooked through, and has reached an internal temperature of at least 165* (F) .)
  7. Garnish with additional fresh oregano or parsley if desired.  Serve w/ some vegetables, mashed potatoes and light garlic toast and enjoy! 

Sunday, January 3, 2010

"Healthy" Chicken Enchiladas


I made these on New Year's Day.  Normally, I would've eaten pork and sauerkraut.  However, last year I made pork and sauerkraut and did not have a lucky year (at least not in terms of overall mood and athletics) so I chose to embark on a different path this year.  I was stumped on what to make but Ron said "how about chicken enchiladas?"

It is a very, VERY rare occasion for Ron to actually suggest something for dinner.  Normally the conversation goes like this:
Me - "What do you want for dinner tonight?"
Ron - "I don't care."
Me - "You have no suggestions?"
Ron - "I'll probably just have cereal."
Me - "We're out of milk.  I guess I'll have to go to the store to buy you some."

Then, I go to the store and end up spending $50 for a carton of milk.  But, usually I come away with enough ingredients to make something for dinner and he eats it.  However, it's still a battle to get him to talk about what he wants.  Considering I'm trying to experience new foods, this is often frustrating because I can only come up with so many "Ron-friendly" foods that I will also enjoy.

So, I was very excited to hear him make a suggestion and I was definitely not going to turn it down.  Ironically, I had most of the ingredients for this recipe.  The only thing I needed were the corn tortillas.  Fortunately, the trip to the SuperTarget only cost me $12 (despite the corn tortillas costing $2).  This was impressive and I am proud of myself.

I've never had enchiladas before.  Anything smothered with cheese doesn't appeal to me.  Then I realized that I could control the cheese portion.  I'm not sure why these enchiladas are deemed "healthier" but I followed the recipe pretty closely.  I did not use nearly as much cheese as included in the recipe, but they still turned out very good.  I changed the way the chicken was prepared by cooking it over the stove and then shredding it.  So, I did not cook my chicken in the sauce.  They still turned out pretty flavorful.  My only complaint was the Mission corn tortillas I used kept falling apart as I rolled them.  Note to self: don't buy the "extra thin" kind.


Healthy Chicken Enchiladas
adapted from My Cooking Quest
Yield:  12 tortillas (if rolled appropriately), serves 6 but Ron ate 10, lol.
Ingredients
  • 1 medium onion, chopped
  • 1 tablespoon canola oil
  • Kosher salt
  • 3 medium garlic cloves, minced
  • 4 tablespoons chili powder
  • 1 tablespoon cumin
  • 2 teaspoons sugar
  • 28-ounce can tomato sauce
  • 1 pound boneless, skinless chicken breasts (I cooked over stove then shredded)
  • Freshly ground black pepper
  • 10 ounces cheddar cheese, shredded (or Taco cheese)
  • 1 (4-ounce) can pickled jalapeno chiles, drained and chopped (or green chiles)
  • ½ cup minced fresh cilantro leaves (I did not use)
  • 12 (6-inch) soft corn tortillas
  • Vegetable oil spray
  • 1 lime, cut into wedges and sour cream (for serving) (I did not use)
Directions
  1. Adjust an oven rack to the middle position and preheat the oven to 400 degrees.  
  2. Heat oil over medium heat, add the onion and ½ teaspoon salt in a large saucepan. 
  3. Cover and cook over medium-low heat, stirring often, until the onion has softened, eight to ten minutes.
  4. Stir in the garlic, chili powder, cumin and sugar and cook until fragrant, about 30 seconds.
  5. Stir in the tomato sauce and bring to a simmer. 
  6. Cook until the sauce has slightly thickened, about five minutes.
  7. **Nestle the chicken into the sauce.  Reduce the heat to low, cover and cook until the chicken is no longer pink in the center and the thickest part registers 160 degrees on the instant read thermometer, 15 to 20 minutes.  Transfer the chicken to a plate to cool.  Season the sauce with salt and pepper to taste.
    1. I omitted step #7.  I put 3 pieces of chicken breasts in a pot covered with water and cooked in boiling water for about 45 minutes.  Once cooked, I shredded the chicken with two forks and went ahead with step #8.  It worked well.
  8. Toss together the shredded chicken, ½ cup of the enchilada sauce, one cup of the cheddar, jalapenos, and cilantro and season with salt and pepper to taste.
  9. Stack the tortillas on a microwave-safe plate, cover with plastic wrap, and microwave on high until warm and pliable, 45 seconds. Spread the warm tortillas out over a clean work surface. 
  10. Place 1/3 cup of the chicken mixture evenly down the center of each tortilla. 
  11. Tightly roll each tortilla around the filling and lay them seam-side down in a 13×9-inch baking dish.
  12. Lightly spray the tops of the enchiladas with vegetable oil spray. 
  13. Pour one cup of the remaining sauce over the enchiladas to cover them thoroughly.
  14. Sprinkle the remaining cheddar over the enchiladas. 
  15. Cover the baking dish with foil and bake until the enchiladas are heated through, 20 to 25 minutes.
  16. Remove the foil and continue to bake until the cheese browns, about five minutes longer.
  17. Place extra sauce, lime wedges and sour cream on table along with the hot enchiladas.

Friday, January 1, 2010

Lemon Chickpea Pasta w/ Chicken

Contrary to my food blog, I do cook and make healthy meals.  I just enjoy a little bit of sugar every now and then :)

This was such an easy recipe to make up and turned out so well.  However, I do plan to make it in the future and add some changes to boost the flavor.  In my dish, I did not include the capers that were in the original recipe.  I think these would have added a really good flavor.  I kept sprinkling hot pepper flakes on my pasta (which worked just fine) but I had a light-bulb go off while eating it.  Next time, I plan to add some cooked spinach & substitute roasted red pepper feta cheese for the Parmesan cheese.  I'll report back with details (though I've included where I'd make the changes) because I think this would taste incredible.  Otherwise, this recipe is good as it is with some bread and a side salad.  I laid my pasta on some spinach leaves and it worked well.

Lemony Chickpea Pasta w/ Chicken
adapted from eat.repeat
Ingredients
  • 1/2 lb small pasta like orecchiette or mini penne (I used 1/2 a box of whole wheat pasta shells)
  • 1 can chickpeas drained and rinsed
  • 1/2 lemon juiced and zested (I used 1 whole lemon)
  • 4 tablespoons good quality olive oil
  • 3 tablespoons hot pasta water
  • 2 tablespoons capers
  • 1 teaspoon hot sauce or red pepper flakes
  • 2 chicken breasts, cooked and cut up into small cubes (I bought from prepared food section to save time)
  • 1/4 cup Parmigiano Reggiano Cheese, grated plus extra for serving
  • salt + pepper to taste
Directions
  1. Cook the pasta in salted, boiling water according to manufacturer directions. 
  2. In a large bowl mix lemon juice, lemon zest, olive oil, capers (if using), hot sauce/peppers and chicken.  (Add the cooked spinach - probably 1/2 of a small box of frozen/thawed/drained.)
  3. Add the chickpeas and stir to coat. 
  4. Drain the pasta, reserving some of the hot water.
  5. Add the pasta to the chickpeas mixture, stir in the cheese (would probably add about 1/3 to 1/2 cup of the feta), while adding the pasta water as you mix. 
  6. Season with salt and pepper. 
  7. Add more lemon juice/hot sauce to your liking.
  8. Serve with extra Cheese.

Dark Chocolate Reese's Pieces PB Cookies


I also made some cookies up (and a Neujahrspretzel but who's counting?) for the gathering.  Despte the crazy cookie madness that was last week w/ Christmas, I still feel compelled to bake up cookies when I get inspired.  I was standing at the grocery store and saw bags of Dark Chocolate Reese's Pieces and Dark Chocolate mini-mint sized york peppermint patties.  I got to thinking.  I searched for the best PB and M&M recipe I could find.  I came up with some slight changes of my own, but the main recipe was from here.

Dark Chocolate Reese's Pieces Peanut Butter Cookies
adapted from Une Gamine dans la Cuisine who adapted from Blog Chef
Yield:  For full recipe, probably about 40 cookies with a large cookie scoop (I halved and got 20)Measurements in recipe below are for the full recipe.
Ingredients
  • 2 1/2 cups of flour
  • 1 tsp. of baking soda 
  • 1 tsp. of baking powder 
  • 1 tsp. of salt ( I used 2 tsp. of sea salt  - makes the cookies taste unbelievable)
  • 1/2 cup of room temp. butter
  • 1/2 cup of vegetable shortening (I used butter flavored shortening because it was all that I had)
  • 1 cup of peanut butter
  • 1 cup of packed light brown sugar
  • 2 eggs beaten
  • 1 tsp. of vanilla extract
  • 1 cup of Dark Chocolate Reese's Pieces (or Dark chocolate M & M's, or milk chocolate)
  • 1/2 cup of Ghirardelli 60% Cacao Bittersweet Baking Chips (optional)
Directions
  1. In a medium bowl, sift together the flour, baking powder, baking soda, and salt. Set aside.
  2. In a large bowl, cream the butter and shortening together. 
  3. Add the peanut butter and beat until smooth. 
  4. Add both sugars and continue to beat until everything is well incorporated. 
  5. Add the eggs one at a time, beating well after each addition. 
  6. Add the vanilla extract and beat to blend. 
  7. Using a large wooden spoon or your hands, add the flour a little bit at a time until there are no white streaks. 
  8. Stir in the Reese's Pieces or M&M's & Chocolate (if using) until they are evenly dispersed through out the batter. 
  9. Cover and refrigerate for an hour.
  10. Preheat the oven to 350F. 
  11. Line baking sheets with parchment paper. 
  12. Scoop out rounded tablespoonfuls of the dough (I used my large cookie scoop) and place each cookie about 2 inches apart. 
  13. If you want, you can make a criss cross pattern with a lightly floured fork. 
  14. Bake for about 8-10 minutes. If you prefer crispy cookies, increase the time to 11-12 minutes.  (Mine were slightly larger and took about 15 minutes at 350 degrees.)
  15. Allow the sheets to cool for 5 minutes before removing the cookies.
CAUTION:  These cookies are amazing.  Then again, I've never really had any problems eating any type of cookie.  The sea salt, dark chocolate and PB combo is to die for.  You must eat one with a cold glass of milk!

S'mores Bars


Oh.  Wow.  These were absolutely incredible.  I had the s'mores recipe bookmarked (from my favorite blog) for a while and was excited to make them up for NYE.  Glen and Sarah came over and they love trying out my baked goods.  The s'mores bars took literally about 10 minutes to make (not counting the 4 hours to set) and were incredible.  My only complaint?  Eat over a plate or napkin.  Otherwise, you will be cleaning up graham cracker crumbs all night!

S'mores Bars
adapted from Annie's Eats (link above) who adapted from Williams Sonoma
Ingredients
  • 3 tbsp. unsalted butter, cut into chunks
  • 6 whole graham crackers (or 1 cup pre-crushed graham cracker crumbs)
  • ¾ cup sweetened condensed milk
  • 1 1/3 cups semi-sweet chocolate chips
  • 1 ½ tsp. vanilla extract
  • 1 pinch of salt
  • 1 cup miniature marshmallows
  • 2 whole graham crackers or 1 cup mini-graham cracker shapes
Directions
  1. Line an 8-inch square baking dish with aluminum foil so that the foil hangs over the sides.
  2. Grease the foil with butter or Baking cooking spray.
  3. In a small saucepan over medium-low heat, melt the 3 tablespoons butter. 
  4. Remove from heat and let cool for 5 minutes.
  5. Put the 6 whole graham crackers into a zippered plastic bag. 
  6. Press out the air and seal the bag. 
  7. Using a rolling pin or your hands, crush the cookies to make tiny crumbs. You should have about 1 cup. (Alternatively, use your food processor to crush the cookies into crumbs.) (I use the pre-crushed grahams; much easier.)
  8. Add the crumbs to the melted butter and stir with a wooden spoon until blended. 
  9. Scrape the crumbs into the baking pan.
  10. Lay a piece of plastic wrap loosely over the crumbs. 
  11. Use your hand over the plastic wrap to spread the crumbs to coat the bottom of the pan.
  12. Press down firmly to make a solid even layer.
  13. In a medium saucepan over medium-low heat, combine the condensed milk and chocolate chips. 
  14. Heat, stirring with a wooden spoon until the chocolate is melted and the mixture is smooth.
  15. Remove from heat. 
  16. Stir in vanilla and salt until blended. 
  17. Pour the filling over the graham cracker crust and spread evenly with the spoon.
  18. Scatter the marshmallows evenly over the chocolate filling and press them in gently. 
  19. Break the 2 whole graham crackers into little pieces and stick the broken crackers or mini-cracker shapes into the filling among the marshmallows.
  20. Cover and refrigerate the bars until they are firm, about 4 hours. 
  21. To serve, lift the foil from the pan and set the smore square on a cutting board. Peel the foil away from the sides and cut the square into rectangles. 
  22. Keep refrigerated until just before serving.  Yield:  12 servings.